
mybatis3学习
一、mybatis简介
暂时不写
二、mybatis的创建
1.目录结构
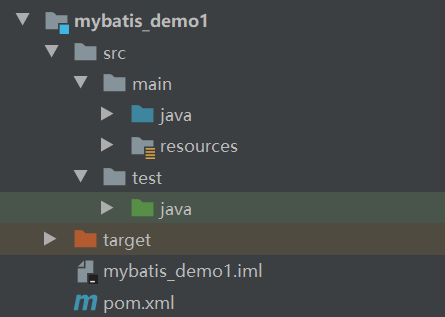
1.1pom.xml
<!--maven核心文件-->
<?xml version="1.0" encoding="UTF-8"?>
<project xmlns="http://maven.apache.org/POM/4.0.0"
xmlns:xsi="http://www.w3.org/2001/XMLSchema-instance"
xsi:schemaLocation="http://maven.apache.org/POM/4.0.0 http://maven.apache.org/xsd/maven-4.0.0.xsd">
<modelVersion>4.0.0</modelVersion>
<!--maven配置文件,包含maven静态资源过滤代码-->
<!--项目创建的gav,最后还要加一个packaging为打包格式,一般为jar-->
<groupId>com.wang.mabatis</groupId>
<artifactId>mybatis_demo1</artifactId>
<version>1.0-SNAPSHOT</version>
<packaging>jar</packaging>
<!--导入jar包的标签-->
<dependencies>
<!-- Mybatis核心 -->
<dependency>
<groupId>org.mybatis</groupId>
<artifactId>mybatis</artifactId>
<version>3.5.9 </version>
</dependency>
<!-- junit测试 -->
<dependency>
<groupId>junit</groupId>
<artifactId>junit</artifactId>
<version>4.12</version>
<scope>test</scope>
</dependency>
<!-- MySQL驱动 -->
<dependency>
<groupId>mysql</groupId>
<artifactId>mysql-connector-java</artifactId>
<version>8.0.22</version>
</dependency>
<!-- log4j日志 -->
<dependency>
<groupId>log4j</groupId>
<artifactId>log4j</artifactId>
<version>1.2.16</version>
</dependency>
</dependencies>
<!--Maven静态资源过滤问题-->
<build>
<resources>
<resource>
<directory>src/main/java</directory>
<includes>
<include>**/*.properties</include>
<include>**/*.xml</include>
</includes>
<filtering>false</filtering>
</resource>
<resource>
<directory>src/main/resources</directory>
<includes>
<include>**/*.properties</include>
<include>**/*.xml</include>
</includes>
<filtering>false</filtering>
</resource>
</resources>
</build>
</project>1.2resources资源包下的mybatis-confi.xml
<?xml version="1.0" encoding="UTF-8" ?>
<!DOCTYPE configuration
PUBLIC "-//mybatis.org//DTD Config 3.0//EN"
"http://mybatis.org/dtd/mybatis-3-config.dtd">
<!--
MyBatis核心配置文件中,标签的顺序:
properties?,settings?,typeAliases?,typeHandlers?,
objectFactory?,objectWrapperFactory?,reflectorFactory?,
plugins?,environments?,databaseIdProvider?,mappers?
-->
<configuration>
<!--引入properties文件-->
<properties resource="jdbc.properties"></properties>
<settings>
<!--将表中字段的下划线自动转换为驼峰-->
<setting name="mapUnderscoreToCamelCase" value="true"/>
<!--开启延迟加载-->
<setting name="lazyLoadingEnabled" value="true"/>
</settings>
<!--设置类型别名-->
<typeAliases>
<!--
typeAlias:设置某个类型的别名
属性:
type:设置需要设置别名的类型
alias:设置某个类型的别名,若不设置该属性,那么该类型拥有默认的别名,即类名且不区分大小写
-->
<!--<typeAlias type="com.atguigu.mybatis.pojo.User"></typeAlias>-->
<!-- <typeAlias type="com.wang.pojo.User" alias="User"></typeAlias>-->
<!--以包为单位,将包下所有的类型设置默认的类型别名,即类名且不区分大小写-->
<package name="com.wang.pojo"/>
</typeAliases>
<!--
environments:配置多个连接数据库的环境
属性:
default:设置默认使用的环境的id
-->
<environments default="development">
<environment id="development">
<!--
transactionManager:设置事务管理方式
属性:
type="JDBC|MANAGED"
JDBC:表示当前环境中,执行SQL时,使用的是JDBC中原生的事务管理方式,事务的提交或回滚需要手动处理
MANAGED:被管理,例如Spring
-->
<transactionManager type="JDBC"/>
<!--
dataSource:配置数据源
属性:
type:设置数据源的类型
type="POOLED|UNPOOLED|JNDI"
POOLED:表示使用数据库连接池缓存数据库连接
UNPOOLED:表示不使用数据库连接池
JNDI:表示使用上下文中的数据源
-->
<dataSource type="POOLED">
<!--设置连接数据库的驱动-->
<property name="driver" value="${jdbc.driver}"/>
<!--设置连接数据库的连接地址-->
<property name="url" value="${jdbc.url}"/>
<!--设置连接数据库的用户名-->
<property name="username" value="${jdbc.username}"/>
<!--设置连接数据库的密码-->
<property name="password" value="${jdbc.password}"/>
</dataSource>
</environment>
</environments>
<!--引入MyBatis映射文件-->
<mappers>
<!--这是传入一个mapper的接口-->
<!--<mapper resource="mappers/UserMapper.xml"/>-->
<!--
以包为单位引入映射文件(多个包目录下的接口)
要求:
1、mapper接口所在的包要和映射文件所在的包一致
2、mapper接口要和映射文件的名字一致
-->
<package name="com.wang.mapper"/>
</mappers>
</configuration>
1.3 resources资源包下的jdbc.properties
在新建中创建资源包,默认后缀为properties
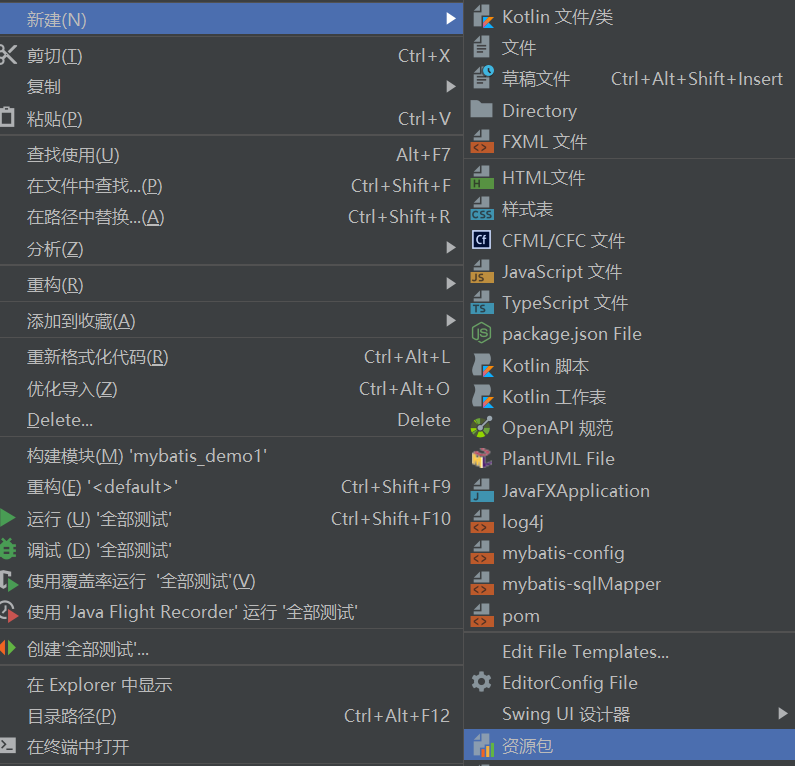
jdbc.driver=com.mysql.cj.jdbc.Driver 名称对应jdbc.driver
jdbc.url=jdbc:mysql://localhost:3306/mybatis?useSSL=true&useUnicode=true&characterEncoding=utf8&serverTimezone=Asia/Shanghai
jdbc.username=root
jdbc.password=123456对应mybatis-config.xml的 <dataSource>标签
<dataSource type="POOLED">
<!--设置连接数据库的驱动-->
<property name="driver" value="${jdbc.driver}"/>
<!--设置连接数据库的连接地址-->
<property name="url" value="${jdbc.url}"/>
<!--设置连接数据库的用户名-->
<property name="username" value="${jdbc.username}"/>
<!--设置连接数据库的密码-->
<property name="password" value="${jdbc.password}"/>
</dataSource>1.4resources资源包下的log4j.xml
<!--对应pom引入的log4j的日志,复制即可-->
<?xml version="1.0" encoding="UTF-8" ?>
<!DOCTYPE log4j:configuration SYSTEM "log4j.dtd">
<log4j:configuration xmlns:log4j="http://jakarta.apache.org/log4j/">
<appender name="STDOUT" class="org.apache.log4j.ConsoleAppender">
<param name="Encoding" value="UTF-8" />
<layout class="org.apache.log4j.PatternLayout">
<param name="ConversionPattern" value="%-5p %d{MM-dd HH:mm:ss,SSS}
%m (%F:%L) \n" />
</layout>
</appender>
<logger name="java.sql">
<level value="debug" />
</logger>
<logger name="org.apache.ibatis">
<level value="info" />
</logger>
<root>
<level value="debug" />
<appender-ref ref="STDOUT" />
</root>
</log4j:configuration>
1.5resources资源包下的xxxMapper.xml
<?xml version="1.0" encoding="UTF8" ?>
<!DOCTYPE mapper
PUBLIC "-//mybatis.org//DTD Mapper 3.0//EN"
"https://mybatis.org/dtd/mybatis-3-mapper.dtd">
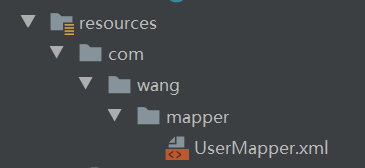
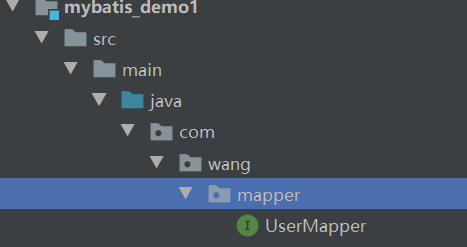
<!--对应java目录下的xxxMapper文件,创建时要与java目录下的mapper文件结构一致,方便在mybatis-config.xml配置文件中以包配置mapper接口-->
<!--
以包为单位引入映射文件(多个包目录下的接口)
要求:
1、mapper接口所在的包要和映射文件所在的包一致
2、mapper接口要和映射文件的名字一致
-->
<mapper namespace="com.wang.mapper.UserMapper">
<!--增删改查等-->
</mapper>1.6 java目录下的pojo(实体层),mapper(接口方法层),untils(封装接口)层
pojo(实体层)
本质上是对应数据库中表的字段
然后写get/set方法,有参和无参的构件,以及toString方法的构建
mapper接口方法层
本质上是对实体类写对应接口方法
untils工具类方法
这里构造了一个封装的Sqlsession的方法,来测试(直接复制方法即可)
package com.wang.utils;
import org.apache.ibatis.io.Resources;
import org.apache.ibatis.session.SqlSession;
import org.apache.ibatis.session.SqlSessionFactory;
import org.apache.ibatis.session.SqlSessionFactoryBuilder;
import java.io.IOException;
import java.io.InputStream;
/**
* @program: mybatis_new_study
* @description: 测试的方法工具
* @author: WMS
* @create:
**/
public class SqlSessionUtils {
public static SqlSession getSqlSession() {
SqlSession sqlSession = null;
try {
InputStream is = Resources.getResourceAsStream("MybatisConfig.xml");
SqlSessionFactory build = new SqlSessionFactoryBuilder().build(is);
sqlSession = build.openSession(true);
} catch (IOException e) {
e.printStackTrace();
}
return sqlSession;
}
}
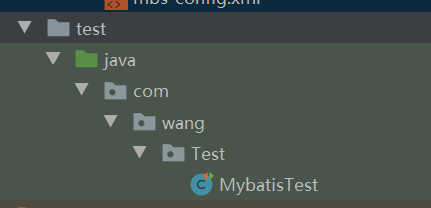
1.6test层测试目录
三:mybatis核心配置文件结构
Mybatis-config.xml
1.头部文件
<!--头部文件-->
<?xml version="1.0" encoding="UTF-8" ?>
<!DOCTYPE configuration
PUBLIC "-//mybatis.org//DTD Config 3.0//EN"
"http://mybatis.org/dtd/mybatis-3-config.dtd">
<!--mybatis-3-config.dtd对应名称,版本,文件性质名称,文件类型dtd-->2.配置<configuration>中的标签
MyBatis核心配置文件中,标签的顺序:
<configuration>
properties?,settings?,typeAliases?,typeHandlers?,
objectFactory?,objectWrapperFactory?,reflectorFactory?,
plugins?,environments?,databaseIdProvider?,mappers?
</configuration>2.1properties
引用资源配置文件
=之间不要有空格
jdbc.driver=com.mysql.cj.jdbc.Driver 名称对应jdbc.driver
jdbc.url=jdbc:mysql://localhost:3306/mybatis?useSSL=true&useUnicode=true&characterEncoding=utf8&serverTimezone=Asia/Shanghai
jdbc.username=root
jdbc.password=123456其路径是
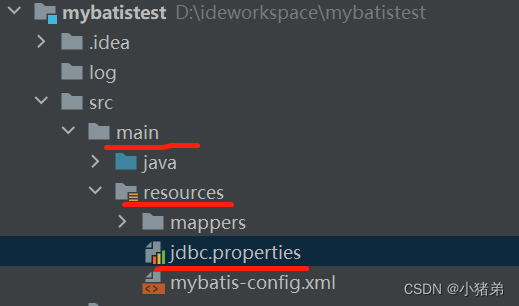
然后mybatis-config.xml如下:
<?xml version="1.0" encoding="utf-8"?>
<!--配置文件中可以使用哪些标签,这个地方是配置这是一个mybatis文件,使用mybatis文件标签-->
<!DOCTYPE configuration PUBLIC "-//mybatis.org//DTD Config 3.0//EN"
"http://mybatis.org/dtd/mybatis-3-config.dtd">
<!--开始配置信息-->
<configuration>
<!-- 导入配置文件 -->
<properties resource="jdbc.properties"></properties>
<!-- environments的 default属性配置的是默认 运行环境,其后面的值就是environment中的id -->
<!--
environments:配置多个连接数据库的环境
属性:
default:设置默认使用的环境的id
-->
<environments default="development">
<environment id="development">
<!--
transactionManager:设置事务管理方式
属性:
type="JDBC|MANAGED"
JDBC:表示当前环境中,执行SQL时,使用的是JDBC中原生的事务管理方式,事务的提交或回滚需要手动处理
MANAGED:被管理,例如Spring
-->
<transactionManager type="JDBC"/>
<!--
dataSource:配置数据源
属性:
type:设置数据源的类型
type="POOLED|UNPOOLED|JNDI"
POOLED:表示使用数据库连接池缓存数据库连接
UNPOOLED:表示不使用数据库连接池
JNDI:表示使用上下文中的数据源
-->
<dataSource type="POOLED">
<!--设置连接数据库的驱动-->
<!-- com.mysql.jdbc.Driver或com.mysql.cj.jdbc.Driver -->
<property name="driver" value="${jdbc.driver}"/>
<!--设置连接数据库的连接地址-->
<property name="url" value="${jdbc.url}"/>
<!--设置连接数据库的用户名-->
<property name="username" value="${jdbc.username}"/>
<!--设置连接数据库的密码-->
<property name="password" value="${jdbc.password}"/>
</dataSource>
</environment>
</environments>
<mappers>
<!-- <mapper resource="映射文件这个地方配置sql语句,后面具体演示"></mapper>-->
<mapper resource="mappers/StudentMapper.xml"></mapper>
</mappers>
</configuration>
其中 <properties resource="jdbc.properties"></properties>是导入properties文件的配置
所以可以设置多个数据库配置,用properties即可
同时配置多个数据库时,在environments标签中配置environment标签,其id不同
2.2settings
这是 MyBatis 中极为重要的调整设置,它们会改变 MyBatis 的运行时行为。 下表描述了设置中各项设置的含义、默认值等。
<settings>
<setting name="cacheEnabled" value="true"/>
<setting name="lazyLoadingEnabled" value="true"/>
<setting name="multipleResultSetsEnabled" value="true"/>
<setting name="useColumnLabel" value="true"/>
<setting name="useGeneratedKeys" value="false"/>
<setting name="autoMappingBehavior" value="PARTIAL"/>
<setting name="autoMappingUnknownColumnBehavior" value="WARNING"/>
<setting name="defaultExecutorType" value="SIMPLE"/>
<setting name="defaultStatementTimeout" value="25"/>
<setting name="defaultFetchSize" value="100"/>
<setting name="safeRowBoundsEnabled" value="false"/>
<setting name="mapUnderscoreToCamelCase" value="false"/>
<setting name="localCacheScope" value="SESSION"/>
<setting name="jdbcTypeForNull" value="OTHER"/>
<setting name="lazyLoadTriggerMethods" value="equals,clone,hashCode,toString"/>
</settings>
settings属性
cacheEnabled: 全局地开启或关闭配置文件中的所有映射器已经配置的任何缓存。参数为:true | false,默认值为:true。运行原理:在同一个session中的同样类型的查询,会调用第一次查询的数据,而不会再次调用MySql语句去访问数据库。
lazyLoadingEnabled:全局启用或禁用延迟加载。当禁用时,所有关联对象都会即时加载。参数为:true | false,默认值为:true。运行原理:懒加载,级联对象都不会加载,而在你需要的时候,返回数据库单独查找。
aggressiveLazyLoading:当启用时,对任意延迟属性的调用会使带有延迟加载属性的对象完整加载;反之,每种属性将会按需加载。参数为:true | false,版本3.4.1 (不包含)之前 true,之后 false。
multipleResultSetsEnabled:是否允许单一语句返回多结果集(需要兼容驱动)。参数为:true | false,默认值为:true。
useColumnLabel:使用列标签代替列名。不同的驱动会有不同的表现,具体可参考相关驱动文档或通过测试这两种不同的模式来观察所用驱动的结果。参数为:true | false,默认值为:true。
useGeneratedKeys: 允许JDBC 支持自动生成主键,需要驱动兼容。如果设置为 true,则这个设置强制使用自动生成主键,尽管一些驱动不能兼容但仍可正常工作(比如 Derby)。参数为:true | false,默认值为:true。
autoMappingBehavior: 指定 MyBatis 应如何自动映射列到字段或属性。NONE 表示取消自动映射。PARTIAL 表示只会自动映射,没有定义嵌套结果集和映射结果集。FULL 会自动映射任意复杂的结果集(无论是否嵌套)。参数为:NONEPARTIAL、FULL,默认值为:PARTIAL。
autoMappingUnkno wnColumnBehavior: 指定自动映射当中未知列(或未知属性类型)时的行为。 默认是不处理,只有当日志级别达到 WARN 级别或者以下,才会显示相关日志,如果处理失败会抛出 SqlSessionException 异常。参数为:NONE、WARNING、FAILING,默认值为:NONE。
defaultExecutorType: 配置默认的执行器。SIMPLE 是普通的执行器;REUSE 会重用预处理语句(prepared statements);BATCH 执行器将重用语句并执行批量更新。参数为:SIMPLE、REUSE、BATCH,默认值为:SIMPLE。
defaultStatementTimeout: 设置超时时间,它决定驱动等待数据库响应的秒数。参数为:任何正整数、Not Set (null)。
defaultFetchSize: 设置数据库驱动程序默认返回的条数限制,此参数可以重新设置。参数为:任何正整数、Not Set (null)。
safeRowBoundsEnabled: 允许在嵌套语句中使用分页(RowBounds)。如果允许,设置 false。参数为:true | false,默认值为:false。
safeResultHandlerEnabled: 允许在嵌套语句中使用分(ResultHandler)。如果允许,设置false。参数为:true | false,默认值为:true。
mapUnderscoreToCamelCase: 是否开启自动驼峰命名规则映射,即从经典数据库列名 A_COLUMN 到经典 Java 属性名 aColumn 的类似映射。参数为:true | false,默认值为:false。
localCacheScopeMyBatis: 利用本地缓存机制(Local Cache)防止循环引用(circular references)和加速联复嵌套査询。默认值为 SESSION,这种情况下会缓存一个会话中执行的所有查询。若设置值为 STATEMENT,本地会话仅用在语句执行上,对相同 SqlScssion 的不同调用将不会共享数据 。参数为:SESSION|STATEMENT,默认值为:SESSION。
jdbcTypeForNull:当没有为参数提供特定的 JDBC 类型时,为空值指定 JDBC 类型。某些驱动需要指定列的 JDBC 类型,多数情况直接用一般类型即可,比如 NULL、VARCHAR 或 OTHER。参数为:NULL、VARCHAR、OTHER,默认值为:OTHER 。
lazyLoadTriggerMethods:指定哪个对象的方法触发一次延迟加载。
defaultScriptingLanguage:指定动态 SQL 生成的默认语言。
callSettersOnNulls:指定当结果集中值为 null 时,是否调用映射对象的 setter(map 对象时为 put)方法,这对于 Map.kcySet() 依赖或 null 值初始化时是有用的。注意,基本类型(int、boolean 等)不能设置成 null。参数为:true | false,默认值为:false。
logPrefix:指定 MyBatis 增加到日志名称的前缀 。参数为:任何字符串,默认值为:Not set。
loglmpl:指定 MyBatis 所用日志的具体实现,未指定时将自动査找。参数为:SLF4J|LOG4J、LOG4J2、JDK_LOGGING、 COMMONS_LOGGING、ST DOUT_LOGGING|NO_LOGGING,默认值为:Not set。
proxyFactory:指定 MyBatis 创建具有延迟加栽能力的对象所用到的代理工具。参数为:CGLIB、JAVASSIST 默认值为:JAVASSIST (MyBatis 版本为 3.3 及以上的) 。
vfsImpl:指定 VFS 的实现类 。提供 VFS 类的全限定名,如果存在多个,可以使用逗号分隔 。默认值为:Not set。
useActualParamName:允许用方法参数中声明的实际名称引用参数。要使用此功能,项目必须被编译为 Java 8 参数的选择。(从版本 3.4.1 开始可以使用)参数为:true | false,默认值为:true。
2.3typeAliases
typeAlias标签这个其实效果有点像是sql语句中的as关键字,其作用是:设置类型的别名。
这个又有三种不同的情况,有不同的效果。
<!--
typeAlias:设置某个类型的别名
属性:
type:设置需要设置别名的类型
alias:设置某个类型的别名,若不设置该属性,那么该类型拥有默认的别名,即类名且不区分大小写
-->例子1: 为一个类指定一个别名
<!-- 创建一个类,其包+类名 com.wang.pojp.User -->
<!-- 这个配置是写在mybatis-config.xml中的 -->
<configuration>
....
<typeAliases >
<typeAlias type="com.wang.pojp.User" alias="User">
<!--<typeAlias type="com.com.wang.pojp.User" -->
</typeAliases>
....
</configuration>
<!-- 这个配置是写在UsertMapper.xml中的 这个返回类型就可以使用自定义别名了 -->
<select id="getAllStudent" resultType="User">
SELECT * FROM testmybatis.student
</select>
<!-- 这个配置是写在UsertMapper.xml中的 如果不设置alias,相对于没写typeAlias标签 ,在xxxMapper.xml中resultType就要返回实体类完整的路径-->
<select id="getAllStudent" resultType="com.wang.pojp.User">
SELECT * FROM testmybatis.student
</select>
但是这样有一个问题,那就是每次为一个类写一个别名都需要写一条。
例子2: 通过package指定包下所有类具有默认别名
<!-- 创建一个类,其包+类名 com.wang.pojp.User -->
<!-- 这个配置是写在mybatis-config.xml中的 -->
<configuration>
....
<typeAliases >
<!--以包为单位,将包下所有的类型设置默认的类型别名,即类名且不区分大小写-->
<package name="com.wang.pojo"/>
</typeAliases>
....
</configuration>
<!-- 这个配置是写在UsertMapper.xml中的 这个返回类型就可以使用默认的类名作为别名了,会默认其包下的类名即为别名,而且不区别大小写。 -->
<!-- List<User> getUser();-->
<select id="getUser" resultType="User">
select * from user;
</select>2.4mappers以及其子标签mapper
<!--引入MyBatis映射文件-->
<mappers>
<!--这是传入一个mapper的接口-->
<!--但是如果是多个的话,那是需要输入很多行,所以其也支持包(应该说文件夹)导入,然后将其包下的配置文件,全部导入其中。-->
<!--<mapper resource="mappers/UserMapper.xml"/>-->
<!--
以包为单位引入映射文件(多个包目录下的接口)
要求:
1、mapper接口所在的包要和映射文件所在的包一致
2、mapper接口要和映射文件的名字一致
-->
<package name="com.wang.mapper"/>
</mappers>看图理解:
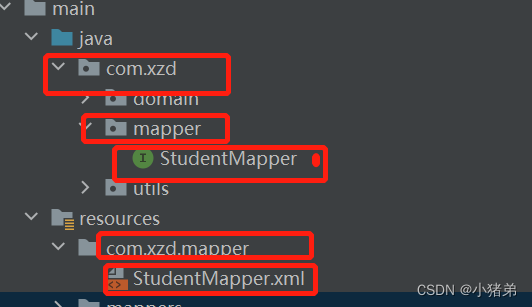
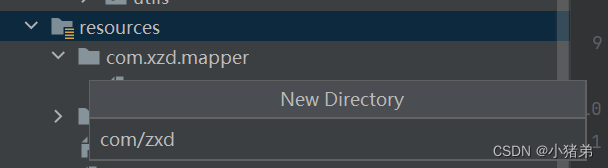
当然在resources创建配置文件的时候,没有package这个创建项目,需要通过创建directory,其中目录需要通过 **/**隔离:
四、XML 映射器
MyBatis 的真正强大在于它的语句映射,这是它的魔力所在。由于它的异常强大,映射器的 XML 文件就显得相对简单。如果拿它跟具有相同功能的 JDBC 代码进行对比,你会立即发现省掉了将近 95% 的代码。MyBatis 致力于减少使用成本,让用户能更专注于 SQL 代码。
SQL 映射文件只有很少的几个顶级元素(按照应被定义的顺序列出):
cache– 该命名空间的缓存配置。cache-ref– 引用其它命名空间的缓存配置。resultMap– 描述如何从数据库结果集中加载对象,是最复杂也是最强大的元素。parameterMap– 老式风格的参数映射。此元素已被废弃,并可能在将来被移除!请使用行内参数映射。文档中不会介绍此元素。sql– 可被其它语句引用的可重用语句块。insert– 映射插入语句。update– 映射更新语句。delete– 映射删除语句。select– 映射查询语句。
1.头部文件
<!--头部文件-->
<?xml version="1.0" encoding="UTF8" ?>
<!DOCTYPE mapper
PUBLIC "-//mybatis.org//DTD Mapper 3.0//EN"
"https://mybatis.org/dtd/mybatis-3-mapper.dtd">
<!--mybatis-3-mapper.dtd对应名称,版本,文件性质名称,文件类型dtd-->2.配置中的标签
<!--namespace对应xxxMapper的接口文件-->
<mapper namespace="com.wang.mapper.UserMapper">
</mapper>3.select
查询语句是 MyBatis 中最常用的元素之一——光能把数据存到数据库中价值并不大,还要能重新取出来才有用,多数应用也都是查询比修改要频繁。 MyBatis 的基本原则之一是:在每个插入、更新或删除操作之间,通常会执行多个查询操作。因此,MyBatis 在查询和结果映射做了相当多的改进。一个简单查询的 select 元素是非常简单的。比如:
<select id="selectPerson" parameterType="int" resultType="hashmap">
SELECT * FROM PERSON WHERE ID = #{id}
</select><select 要加resultType>
增删改不用加1.select 表示这是一个查询语句。
2.id="selectPerson" 表示该标签的唯一标识,selectPerson与 Java 接口中的 selectPerson 方法一一匹配。PS:该值不允许重复,否则会报错。
3.parameterType="int"` 表示入参是 int 类型。
MyBatis中设置了默认的类型别名
java.lang.Integer-->int,integer
int-->_int,_integer
Map-->map
String-->string
4.resultType="hashmap" 表示返回的结果集为 HaspMap。
5.SELECT * FROM PERSON WHERE ID = #{id}` 表示要执行的 SQL 语句。
| 属性 | 描述 |
|---|---|
| id | 在命名空间中唯一的标识符,可以被用来引用这条语句。 |
| parameterType | 将会传入这条语句的参数的类全限定名或别名。这个属性是可选的,<br/>因为 MyBatis 可以通过类型处理器(TypeHandler)推断出具体<br/>传入语句的参数,默认值为未设置(unset)。 |
| resultType | 期望从这条语句中返回结果的类全限定名或别名。注意,如果返回的<br/>是集合,那应该设置为集合包含的类型,而不是集合本身的类型。<br/>resultType 和 resultMap 之间只能同时使用一个。 |
| resultMap | 对外部 resultMap 的命名引用。结果映射是 MyBatis 最强大的特性,<br/>如果你对其理解透彻,许多复杂的映射问题都能迎刃而解。<br/>resultType 和 resultMap 之间只能同时使用一个。 |
| flushCache | 将其设置为 true 后,只要语句被调用,都会导致本地缓存和二级缓存<br/>被清空,默认值:false。 |
| useCache | 将其设置为 true 后,将会导致本条语句的结果被二级缓存缓存起来,<br/>默认值:对 select 元素为 true。 |
| timeout | 这个设置是在抛出异常之前,驱动程序等待数据库返回请求结果的秒<br/>数。默认值为未设置(unset)(依赖数据库驱动)。 |
4.insert, update 和 delete
增、删、改标签与查询标签的属性差不多,增、删、改的示例代码如下:
<insert
id="insertAuthor"
parameterType="domain.blog.Author"
flushCache="true"
statementType="PREPARED"
keyProperty=""
keyColumn=""
useGeneratedKeys=""
timeout="20">
<update
id="updateAuthor"
parameterType="domain.blog.Author"
flushCache="true"
statementType="PREPARED"
timeout="20">
<delete
id="deleteAuthor"
parameterType="domain.blog.Author"
flushCache="true"
statementType="PREPARED"
timeout="20">
增、删、改标签常用的属性如下表格所示:
| 属性 | 描述 |
|---|---|
| id | 在命名空间中唯一的标识符,可以被用来引用这条语句。 |
| parameterType | 将会传入这条语句的参数的类全限定名或别名。这个属性是可选的,<br/>因为 MyBatis 可以通过类型处理器(TypeHandler)推断出具体<br/>传入语句的参数,默认值为未设置(unset)。 |
| flushCache | 将其设置为 true 后,只要语句被调用,都会导致本地缓存和二级缓存<br/>被清空,默认值:false。 |
| timeout | 这个设置是在抛出异常之前,驱动程序等待数据库返回请求结果的秒<br/>数。默认值为未设置(unset)(依赖数据库驱动)。 |
5.resultMap
描述如何从数据库结果集中加载对象,是最复杂也是最强大的元素。
1、属性说明
- id属性 ,resultMap标签的标识。
- type属性 ,返回值的全限定类名,或类型别名。
- autoMapping属性 ,值范围true(默认值)|false, 设置是否启动自动映射功能,自动映射功能就是自动查找与字段名小写同名的属性名,并调用setter方法。而设置为false后,则需要在
resultMap内明确注明映射关系才会调用对应的setter方法。
2、基本作用:建立SQL查询结果字段与实体属性的映射关系
示例1:通过setter构造[领域模型]
package com.wang.pojo;
/**
* @program: mybatis_new_study
* @description: 员工表t_emp
* @author: WMS
* @create: 2023-02-14 19:54
**/
public class Emp {
private Integer eid;
private String empName;
private int age;
private String sex;
private String email;
/**
* 必须提供一个无参数的构造函数
*/
public Emp() {
}
//有参方法
// getter,setter方法
//toString方法
}<?xml version="1.0" encoding="UTF-8" ?>
<!DOCTYPE mapper PUBLIC "-//mybatis.org//DTD Mapper 3.0//EN" "http://mybatis.org/dtd/mybatis-3-mapper.dtd" >
<mapper namespace="com.wang.mapper.EmpMapper">
<!--
resultMap:设置自定义映射关系
id:唯一标识,不能重复
type:设置映射关系中的实体类类型
子标签:
id:设置主键的映射关系
result:设置普通字段的映射关系
属性:
property:设置映射关系中的属性名,必须是type属性所设置的实体类类型中的属性名
column:设置映射关系中的字段名,必须是sql语句查询出的字段名
-->
<resultMap id="empResultMap" type="Emp">
<id property="eid" column="eid"></id>
<result property="empName" column="emp_Name"></result>
<result property="age" column="age"></result>
<result property="sex" column="sex"></result>
<result property="email" column="email"></result>
</resultMap>
<!--List<Emp> getAllEmp();-->
<select id="getAllEmp" resultMap="empResultMap">
select * from t_emp;
</select>
</mapper>id、result语句属性配置细节:
| 属性 | 描述 |
|---|---|
| property | 需要映射到JavaBean 的属性名称。 |
| column | 数据表的列名或者标签别名。 |
| javaType | 一个完整的类名,或者是一个类型别名。如果你匹配的是一个JavaBean,那MyBatis 通常会自行检测到。然后,如果你是要映射到一个HashMap,那你需要指定javaType 要达到的目的。 |
| jdbcType | 数据表支持的类型列表。这个属性只在insert,update 或delete 的时候针对允许空的列有用。JDBC 需要这项,但MyBatis 不需要。如果你是直接针对JDBC 编码,且有允许空的列,而你要指定这项。 |
| typeHandler | 使用这个属性可以覆写类型处理器。这项值可以是一个完整的类名,也可以是一个类型别名。 |
示例2:通过构造函数构造领域模型
<select id="getStudent" resultMap="getStudentRM">
SELECT ID, Name, Age
FROM TStudent
</select>
<resultMap id="getStudentRM" type="EStudnet">
<constructor>
<idArg column="ID" javaType="_long"/>
<arg column="Name" javaType="String"/>
<arg column="Age" javaType="_int"/>
</constructor>
</resultMap>子元素说明:
- constructor元素 ,指定使用指定参数列表的构造函数来实例化领域模型。注意:其子元素顺序必须与参数列表顺序对应
- idArg子元素 ,标记该入参为主键
- arg子元素 ,标记该入参为普通字段(主键使用该子元素设置也是可以的)
方法二:
通过起别名的方式,让实体类与数据库表对应(会很乱)
TEXT<select id="getAllEmp" resultMap="empResultMap"> select eid,emp_name,age,sex,email from t_emp; </select>方法三:
在核心mybatis-config.xml中的setting标签中设置(局限性高)
Xml<!-- 将_自动映射为驼峰,emp_name:empName --> <setting name="mapUnderscoreToCamelCase" value="true"/>
6.多对一映射处理
三种方式:级联属性、联合、分步查询(支持延迟加载)
级联属性
例1:使用级联属性查询 (引用.属性)
//在实体类A中添加实体类B,并添加getter/setter+toString等方法
public class Emp {
private Integer eid;
private String empName;
private int age;
private String sex;
private String email;
private Dept dept;//添加的内容
//getter/setter+toString+有参和无参方法
}//在接口类中添加方法
/*根据id查询员工以及员工对应的部门名称*/
Emp getEmpAndDept(@Param("eid") Integer eid);//在xml映射文件中用在实体类中命名的为引用.属性名为property
<!-- /*根据id查询员工以及员工对应的部门名称*/
Emp getEmpAndDept(@Param("eid") Integer eid);-->
<resultMap id="empAndDeptResult" type="Emp">
<id property="eid" column="eid"></id>
<result property="empName" column="emp_Name"></result>
<result property="age" column="age"></result>
<result property="sex" column="sex"></result>
<result property="email" column="email"></result>
<!-- 使用级联属性查询 (引用.属性)-->
<result property="dept.did" column="did"></result>
<result property="dept.deptName" column="dept_name"></result>
</resultMap>
<select id="getEmpAndDept" resultMap="">
select * from t_emp
left join t_dept on t_emp.did = t_dept.did
where t_eid = #{eid}
</select>
public class MybatisTest {
@Test
public void getEmpAndDeptTest(){
SqlSession sqlSession = SqlsessionUtils.getSqlSession();
EmpMapper mapper = sqlSession.getMapper(EmpMapper.class);
System.out.println(mapper.getEmpAndDept(1));
}总结步骤:
1:多对一时,在实体类A中写实体类B的参数对象,并写上对应getting/setter,toString和有参/无参方法。
2:在xxxMapper.xml调用sql语句要用到实体类B对应数据库的字段,用实体类A中设置的实体类B的对象来调用,放在property中,对应column为实体类B对应的数据库字段名称。
使用association(联合)查询
在实体类A上写实体类B的对象还是要写的
Emp getEmpAndDept(@Param("eid") Integer eid);-->
<resultMap id="empAndDeptResult" type="Emp">
<id property="eid" column="eid"></id>
<result property="empName" column="emp_Name"></result>
<result property="age" column="age"></result>
<result property="sex" column="sex"></result>
<result property="email" column="email"></result>
<!--
association:处理多对一的映射关系
property:需要处理多对的映射关系的属性名
javaType:该属性的类型,其中Dept为pojo对应的实体类的类型
-->
<association property="dept" javaType="Dept">
<id property="did" column="did"></id>
<result property="deptName" column="dept_name"></result>
</association>
</resultMap>
<select id="getEmpAndDept" resultMap="empAndDeptResult">
select * from t_emp
left join t_dept on t_emp.did = t_dept.did
where t_emp.eid = #{eid}
</select>
分步查询
根据根据id查询员工以及员工对应的部门名称,id
可以理解为
1:在association标签中,添加一个select来把参数查出来并赋值,
2:
第一步:
//在emp中创建接口方法
///*根据id查询员工以及员工对应的部门名称*/
Emp getEmpAndDeptByStepOne(@Param("eid") Integer eid); <resultMap id="empAndDeptByStepResultMap" type="Emp">
<id property="eid" column="eid"/>
<result property="empName" column="emp_name"/>
<result property="age" column="age"/>
<result property="sex" column="sex"/>
<result property="email" column="email"/>
<!--相当于引入dept中的select查到的sql方法,然后传入column中的did,-->
<!--传入did后,正常执行下面的sql语句-->
<association property="dept" select="com.wang.mapper.DeptMapper.getEmpAndDeptByStepTwo" column="did" fetchType="eager">
<!--property:需要处理多对的映射关系的属性名
select:设置分步查询的sql的唯一标识(namespace.SQLId或mapper接口的全类名.方法名)
在接口方法中,点击方法名,鼠标右键,选择复制引用(Y)
column:设置分布查询的条件
fetchType:当开启了全局的延迟加载之后,可通过此属性手动控制延迟加载的效果
fetchType="lazy|eager":lazy表示延迟加载(加载当前执行的sql,获得对应参数),eager表示立即加载(立即加载sql再获取参数)
-->
</association>
</resultMap>
<!--Emp getEmpAndDeptByStepOne(@Param("eid") Integer eid);-->
<select id="getEmpAndDeptByStepOne" resultMap="empAndDeptByStepResultMap">
select * from t_emp
left join t_dept on t_emp.did = t_dept.did
where t_emp.eid = #{eid}
</select>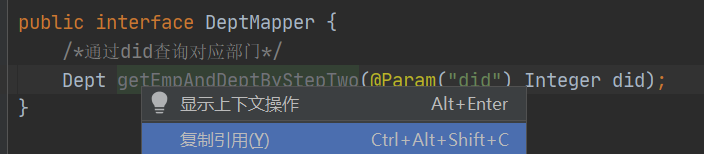
第二步:在DeptMapper创建接口方法,通过did查询对应部门
/*通过did查询对应部门*/
Dept getEmpAndDeptByStepTwo(@Param("did") Integer did);
<!--在DeptMapper.xml写对应方法查did-->
<?xml version="1.0" encoding="UTF-8" ?>
<!DOCTYPE mapper PUBLIC "-//mybatis.org//DTD Mapper 3.0//EN" "http://mybatis.org/dtd/mybatis-3-mapper.dtd" >
<mapper namespace="com.wang.mapper.DeptMapper">
<resultMap id="DeptMap" type="Dept">
<id property="did" column="did"></id>
<result property="deptName" column="dept_name"></result>
</resultMap>
<!-- Dept getEmpAndDeptByStepTwo(@Param("did") Integer did);-->
<select id="getEmpAndDeptByStepTwo" resultMap="DeptMap">
select * from t_dept where did = #{did}
</select>
</mapper>好处:分开写了两个sql语句,对应A功能方法,B功能方法,A+B功能方法。这样可以有很多功能
分步查询的优点:可以实现延迟加载,但是必须在核心配置文件中设置全局配置信息:
<setting>标签中的
lazyLoadingEnabled(延迟加载):延迟加载的全局开关。当开启时,所有关联对象都会延迟加载 ,默认false
aggressiveLazyLoading(立即加载):当开启时,任何方法的调用都会加载该对象的所有属性。 否则,每个 属性会按需加载 ,此时就可以实现按需加载,获取的数据是什么,就只会执行相应的sql。默认false(在3.4.1以下默认true)
此时可通过association和 collection中的
fetchType属性设置当前的分步查询是否使用延迟加载,fetchType="lazy(延迟加 载)|eager(立即加载)"
属性 描述 column数据库中的列名,或者是列的别名。一般情况下,这和传递给 resultSet.getString(columnName)方法的参数一样。 注意:在使用复合主键的时候,你可以使用column="{prop1=col1,prop2=col2}"这样的语法来指定多个传递给嵌套 Select 查询语句的列名。这会使得prop1和prop2作为参数对象,被设置为对应嵌套 Select 语句的参数。select用于加载复杂类型属性的映射语句的 ID,它会从 column 属性指定的列中检索数据,作为参数传递给目标 select 语句。 具体请参考下面的例子。注意:在使用复合主键的时候,你可以使用 column="{prop1=col1,prop2=col2}"这样的语法来指定多个传递给嵌套 Select 查询语句的列名。这会使得prop1和prop2作为参数对象,被设置为对应嵌套 Select 语句的参数。fetchType可选的。有效值为 lazy和eager。 指定属性后,将在映射中忽略全局配置参数lazyLoadingEnabled,使用属性的值。
延迟加载
可以简单理解为,只有在使用的时候,才会发出sql语句进行查询。
为了避免一些无谓的性能开销而提出来的,所谓延迟加载就是当在真正需要数据的时候,才真正执行数据加载操作。
滥用延迟加载
因延迟加载而导致的与数据源进行多次交互而带来的性能问题
延迟加载vs立即加载
7.一对多映射关系处理
一对多,例如一个dept表中一个部门对应多个员工,通过部门id查对应员工信息
collection
<!--
collection:处理一对多的映射关系
ofType:表示该属性所对应的集合中存储数据的类型
-->1.在Dept实体类上加一个员工的集合
public class Dept {
private Integer did;
private String deptName;
private List<Emp> emps;
public Dept() {
}
//getter和setting等方法在部门EmpMapper接口方法定义
//根据did查员工信息
Dept getDeptAndEmp(@Param("did") Integer did); <!-- Dept getDeptAndEmp(@Param("did") Integer did);-->
<select id="getDeptAndEmp" resultMap="getDeptAndEmpResultMap">
select * from t_dept left join t_emp on t_dept.did = t_emp.did where t_dept.did = #{did}
</select>
<resultMap id="getDeptAndEmpResultMap" type="Dept">
<id property="did" column="did"></id>
<result property="deptName" column="dept_name"></result>
<collection property="emps" ofType="Emp">
<id property="eid" column="eid"></id>
<result property="empName" column="emp_name"></result>
<result property="age" column="age"></result>
<result property="sex" column="sex"></result>
<result property="email" column="email"></result>
</collection>
</resultMap>//测试
@Test
public void getDeptAndEmpTest(){
SqlSession sqlSession = SqlsessionUtils.getSqlSession();
DeptMapper mapper = sqlSession.getMapper(DeptMapper.class);
System.out.println(mapper.getDeptAndEmp(2));
}
//Dept{did=2, deptName='B', emps=[Emp{eid=2, empName='明', age=3, sex='m', email='123@qq.com', dept=null}]}分步查询
sql分步查询:一个dept表中一个部门对应多个员工,通过部门id查对应员工信息
1、先查dept表中的数据,根据did
2、在第一步查到的did传参,根据这个did在emp表中也存在,查出emp对应员工信息
执行了两个sql语句
//在Dept实体类接口写方法
Dept getDeptByDid(@Param("did") Integer did);<!--在DeptMapper写sql -->
<!--Dept getDeptByDid(@Param("did") Integer did);-->
<select id="getDeptByDid" resultMap="getDeptByDidResultMap">
<!--查did-->
select * from t_dept where did = #{did}
</select>
<resultMap id="getDeptByDidResultMap" type="Dept">
<id property="did" column="did"></id>
<result property="deptName" column="dept_name"></result>
<!--根据在Emp接口方法查did-->
<collection property="emps"
select="com.wang.mapper.EmpMapper.getAllByDid"
column="did">
</collection>
</resultMap>//在EmpMapper接口处查did
List<Emp> getAllByDid(@Param("did") Integer did);//sql语句
<!-- List<Emp> getAllByDid(@Param("did") Integer did);-->
<select id="getAllByDid" resultType="Emp">
select * from t_emp where did = #{did}
</select>//测试
@Test
public void getDeptByDidTest(){
SqlSession sqlSession = SqlsessionUtils.getSqlSession();
DeptMapper mapper = sqlSession.getMapper(DeptMapper.class);
System.out.println(mapper.getDeptByDid(1));
}
DEBUG 02-16 11:08:04,808 ==> Preparing: select * from t_dept where did = ? (BaseJdbcLogger.java:137)
DEBUG 02-16 11:08:04,836 ==> Parameters: 1(Integer) (BaseJdbcLogger.java:137)
DEBUG 02-16 11:08:04,855 ====> Preparing: select * from t_emp where did = ? (BaseJdbcLogger.java:137)
DEBUG 02-16 11:08:04,856 ====> Parameters: 1(Integer) (BaseJdbcLogger.java:137)
DEBUG 02-16 11:08:04,859 <==== Total: 2 (BaseJdbcLogger.java:137)
DEBUG 02-16 11:08:04,861 <== Total: 1 (BaseJdbcLogger.java:137)
Dept{did=1, deptName='A', emps=[Emp{eid=1, empName='null', age=2, sex='m', email='123@qq.com', dept=null}, Emp{eid=3, empName='null', age=4, sex='w', email='123@qq.com', dept=null}]}select * from t_dept where did = ?
select * from t_emp where did = ?
执行了两条sql
一般默认立即加载,可以开启全局加载,也可以单独在collection标签里面用fetchType="lazy(延迟加 载)|eager(立即加载)"
其他补充
1.#{} 与 ${} 的区别
-
MyBatis获取参数值的两种方式:${}和#{}
- ${}本质字符串拼接,与 Java 中的字符串拼接功能一致,若为字符串类型或日期类型的字段进行赋值时,需要手动加单引号
- #{}本质占位符赋值,与 JDBC 中的 ?,为字符串类型或日期类型的字段进行赋值时,可以自动添加单引号
MyBatis获取参数值的各种情况:
1、mapper接口方法的参数为单个的字面量类型
-
可以通过${} 和#{}
-
以任意的名称获取参数值,但是需要注意${}的单引号问题
2、mapper接口方法的参数为多个时
-
此时MyBatis会将这些参数放在一个map集合中,以两种方式进行存储
-
a>以arg0,arg1...为键,以参数为值
-
b>以param1,param2...为键,以参数为值
-
因此只需要通过#{}和${}以键的方式访问值即可,但是需要注意${}的单引号问题
-
3、若mapper接口方法的参数有多个时,可以手动将这些参数放在一个map中存储
-
只需要通过#{}和${}以键的方式访问值即可,但是需要注意${}的单引号问题
-
4、mapper接口方法的参数是实体类类型的参数
-
只需要通过#{}和${}以属性的方式访问属性值即可,但是需要注意${}的单引号问题
-
5、使用@Param注解命名参数
-
此时MyBatis会将这些参数放在一个map集合中,以两种方式进行存储
-
a>以@Param注解的值为键,以参数为值
-
b>以param1,param2...为键,以参数为值
-
因此只需要通过#{}和${}以键的方式访问值即可,但是需要注意${}的单引号问题
1.1:单个字面量类型的参数
若mapper接口中的方法参数为单个的字面量类型,由于#{}和${}的赋值只和顺序有关而与名称无关,所以此时可以使用${}和#{}以任意的名称获取参数的值,注意${}需要手动加单引号。
1)实现根据用户名查询用户信息的功能:
在mapper接口文件ParamererMapper.java中配置:
//根据用户名查询用户信息
User getUserByUsername(String username);2)在mapper映射文件ParameterMapper.xml中关联mapper接口文件:
<!--实现根据用户名查询用户信息的功能。将该SQL语句的方法与mapper接口中getUserByUsername(String username)方法关联-->
<select id="getUserByUsername" resultType="User">
<!--使用#{}时,大括号里的名称可以写成任意名称如#{aaa}等。因为使用#{}进行赋值时,只和赋值顺序有关,和名称无关-->
<!--select * from t_user where username = #{username}-->
<!--使用${}时,大括号里的名称也可以写成任意名称,但是还需要加上''以符合sql语法-->
select * from t_user where username = '${username}'
</select>3)在TestParameterMapper.java测试类中编写测试方法:
//测试根据用户名获取用户信息的功能
@Test
public void testGetUserByUsername(){
SqlSession sqlSession = SqlSessionUtils.getSqlSession();
ParameterMapper mapper = sqlSession.getMapper(ParameterMapper.class);
User user = mapper.getUserByUsername("admin");
System.out.println(user);
}1.2:多个字面量类型的参数
若mapper接口中的方法参数为多个时。此时MyBatis会自动将这些参数放在一个map集合中,以arg0,arg1,...为键,以参数为值;或者以param1,param2,...为键,以参数为值;因此只需要通过${} 和#{}
访问map集合的键就可以获取相对应的值,注意${}需要手动加单引号。
1)实现验证登录的功能:
在mapper接口文件ParamererMapper.java中配置:
//验证登录
User checkLogin(String username, String password);2)在mapper映射文件ParameterMapper.xml中关联mapper接口文件:
<!--实现验证登录的功能。将该SQL语句的方法与mapper接口中checkLogin(String username, String password)方法关联-->
<select id="checkLogin" resultType="User">
<!--
当参数为多个字面量类型时,系统会自动把多个参数放入一个map集合中([arg1, arg0, param1, param2]),
然后以arg为key,以参数为value,或者以param为key,以参数为value。因此有多个参数时,使用arg或者param来赋值。
-->
<!--select * from t_user where username = #{arg0} and password = #{arg1}-->
<!--select * from t_user where username = #{param1} and password = #{param2}-->
select * from t_user where username = '${arg0}' and password = '${arg1}'
</select>3)在TestParameterMapper.java测试类中编写测试方法:
//测试验证登录的功能
@Test
public void testCheckLogin(){
SqlSession sqlSession = SqlSessionUtils.getSqlSession();
ParameterMapper mapper = sqlSession.getMapper(ParameterMapper.class);
User user = mapper.checkLogin("admin", "123456");
System.out.println(user);1.3:map集合类型的参数
方式一:
若mapper接口中的方法需要的参数为多个时,此时可以手动创建map集合,将这些数据放在map中,只需要通过${}和#{}
访问map集合的键就可以获取相对应的值,注意${}需要手动加单引号。
1)实现验证登录(参数为map)的功能:
在mapper接口文件ParamererMapper.java中配置:
//验证登录(参数为map)
User checkLoginByMap(Map<String, Object> map);2)在mapper映射文件ParameterMapper.xml中关联mapper接口文件:
<!--实现验证登录(参数为map)的功能。将该SQL语句的方法与mapper接口中checkLoginByMap(Map<String, Object> map)方法关联-->
<select id="checkLoginByMap" resultType="User">
<!--此时#{}和${}中的名称以自己定义的map的key为准-->
<!--select * from t_user where username = #{username} and password = #{password}-->
select * from t_user where username = '${username}' and password = '${password}'
</select>3)在TestParameterMapper.java测试类中编写测试方法:
//测试验证登录(参数为map)的功能
@Test
public void testCheckLoginByMap(){
SqlSession sqlSession = SqlSessionUtils.getSqlSession();
ParameterMapper mapper = sqlSession.getMapper(ParameterMapper.class);
Map<String, Object> map = new HashMap<String, Object>();
map.put("username", "admin");
map.put("password", "123456");
User user = mapper.checkLoginByMap(map);
System.out.println(user);方式二:list+map集合方式
/**
* 查询所有用户信息为map集合
* @return
* 将表中的数据以map集合的方式查询,一条数据对应一个map;若有多条数据,就会产生多个map集合,此
时可以将这些map放在一个list集合中获取
*/
List<Map<String, Object>> getAllUserToMap();
<!--Map<String, Object> getAllUserToMap();-->
<select id="getAllUserToMap" resultType="map">
select * from t_user
</select>方式三:mapkey注解的方式
/**
* 查询所有用户信息为map集合
* @return
* 将表中的数据以map集合的方式查询,一条数据对应一个map;若有多条数据,就会产生多个map集合,并
且最终要以一个map的方式返回数据,此时需要通过@MapKey注解设置map集合的键,值是每条数据所对应的
map集合
*/
@MapKey("id")
Map<String, Object> getAllUserToMap();
<!--Map<String, Object> getAllUserToMap();-->
<select id="getAllUserToMap" resultType="map">
select * from t_user
</select>
结果:
<!--
{
1={password=123456, sex=男, id=1, age=23, username=admin},
2={password=123456, sex=男, id=2, age=23, username=张三},
3={password=123456, sex=男, id=3, age=23, username=张三}
}
-->1.4:实体类类型的参数
可以使用#{}和${}直接通过实体类中的属性名获取属性值。是实际用到的最多的情况之一。
1)实现添加用户信息的功能:
在mapper接口文件ParamererMapper.java中配置:
//添加用户信息
int insertUser(User user);2)在mapper映射文件ParameterMapper.xml中关联mapper接口文件:
<!--实现添加用户信息的功能。将该SQL语句的方法与mapper接口中insertUser(User user)方法关联-->
<insert id="insertUser">
<!--使用#{}和${}直接通过实体类中的属性名获取属性值-->
insert into t_user values(null, #{username}, #{password}, #{age}, #{sex}, #{email})
</insert>3)在TestParameterMapper.java测试类中编写测试方法:
//测试添加用户信息的功能
@Test
public void testInsertUser(){
SqlSession sqlSession = SqlSessionUtils.getSqlSession();
ParameterMapper mapper = sqlSession.getMapper(ParameterMapper.class);
int result = mapper.insertUser(new User(null, "李四", "123", 23, "男", "123@qq.com"));
System.out.println(result);1.5:@Param注解命名参数
此时MyBatis会将这些参数放在一个map集合中,以两种方式进行存储:以@Param注解中的值为key,以之后的参数为value;或者以param1,param2,...为key,以参数为value。因此只需要通过#{}和${}以键的方式来访问值即可,但是需要注意${}的单引号问题。也是实际用到的最多的情况之一。
1)实现验证登录(使用@Param注解)的功能:
在mapper接口文件ParamererMapper.java中配置:
//验证登录(使用@Param注解)
/**
* 使用@param注解后,MyBatis会将参数放入map集合,然后以@Param
* 注解中的值为key,以之后的参数为value
*/
User checkLoginByParam(@Param("username") String username, @Param("password") String password);2)在mapper映射文件ParameterMapper.xml中关联mapper接口文件:
<!--
实现验证登录(使用@Param注解)的功能。将该SQL语句的方法与mapper接口中
checkLoginByParam(@Param("username") String username, @Param("password") String password)方法关联
-->
<select id="checkLoginByParam" resultType="User">
select * from t_user where username = #{username} and password = #{password}
</select>3)在TestParameterMapper.java测试类中编写测试方法:
//测试验证登录(使用@Param注解)的功能
@Test
public void testCheckLoginByParam(){
SqlSession sqlSession = SqlSessionUtils.getSqlSession();
ParameterMapper mapper = sqlSession.getMapper(ParameterMapper.class);
User user = mapper.checkLoginByParam("admin", "123456");
System.out.println(user);1.6:多种获取参数值方式的总结
获取参数值方式有五种,但其实可以将其总结为两类:
- 使用实体类获取参数值
- 使用@Param获取参数值
这样不管是获取单个参数值还是多个参数值时,都可以解决问题。
三种模糊查询的方式
select * from user where username like '%${}%'
select * from user where username like concat ('%',#{username},'%')
select * from user where username like "%"#{username}"%"批量删除
即在sql语句中在where子句加参数#{}
<!--在xxxMapper接口方法中-->
int deleteMore(@Param("ids") String ids);
<!--在xxxMapper.xml中的sql语句-->
<!--int deleteMore(@Param("ids") String ids);-->
<delete id="deleteMore">
delete from t_user where id in (${ids})
</delete>动态设置表名
/**
* 动态设置表名,查询所有的用户信息
* @param tableName
* @return
*/
List<User> getAllUser(@Param("tableName") String tableName);<!--List<User> getAllUser(@Param("tableName") String tableName);-->
<select id="getAllUser" resultType="User">
select * from ${tableName}
</select>添加功能获取自增的主键
/**
* 添加用户信息
* @param user
* @return
* useGeneratedKeys:设置使用自增的主键
* keyProperty:因为增删改有统一的返回值是受影响的行数,因此只能将获取的自增的主键放在传输的参
数user对象的某个属性中
*/
int insertUser(User user);
<!--int insertUser(User user);-->
<insert id="insertUser" useGeneratedKeys="true" keyProperty="id">
insert into t_user values(null,#{username},#{password},#{age},#{sex})
</insert>8.2 resultType 与 resultMap 的区别
- resultType 表示返回的是原始数据类型或者 JavaBean 对象。
- resultMap 表示返回的 MyBatis 的 resultMap 标签中的结果列,该结果列本质由 resultType 类型组合而成。所有的 resultType 的执行在最终过程都是转换成 resultMap 类型进行执行。
五、动态SQL
Mybatis框架的动态SQL技术是一种根据特定条件动态拼装SQL语句的功能,它存在的意义是为了解决 拼接SQL语句字符串时的痛点问题。
if
if标签可通过test属性的表达式进行判断,若表达式的结果为true,则标签中的内容会执行;反之标签中 的内容不会执行
/*获取emp表中所有信息*/
List<Emp> getEmp(Emp emp);<!-- List<Emp> getEmp(Emp emp);-->
<select id="getEmp" resultType="Emp" >
select * from t_emp where 1=1
<!--1=1来使恒成立,同时后面接and来拼接sql语句-->
<if test="empName !=null and empName !=''">
emp_name = #{empName}
</if>
<if test="age !=null and age !=''">
and age = #{age}
</if>
<if test="sex !=null and sex !=''">
and sex = #{sex}
</if>
<if test="email !=null and email !=''">
and email= #{email}
</if>
</select>where
where和if一般结合使用: a>若where标签中的if条件都不满足,则where标签没有任何功能,即不会添加where关键字 b>若where标签中的if条件满足,则where标签会自动添加where关键字,并将条件最前方多余的 and去掉 注意:where标签不能去掉条件最后多余的and
<!-- List<Emp> getEmp(Emp emp);-->
<select id="getEmp" resultType="Emp" >
select * from t_emp
<where>
<if test="empName !=null and empName !=''">
and emp_name = #{empName}
</if>
<if test="age !=null and age !=''">
and age = #{age}
</if>
<if test="sex !=null and sex !=''">
and sex = #{sex}
</if>
<if test="email !=null and email !=''">
and email= #{email}
</if>
</where>当where标签中有内容时,会自动生成where关键字,并且将内容前多余的and或or去掉 * 当where标签中没有内容时,此时where标签没有任何效果 * 注意:where标签不能将其中内容后面多余的and或or去掉
- and emp_name = #{empName}是对的,可以省略
- emp_name = #{empName} and 是错的,不能省略后面的and或or
trim
trim:
-
若标签中有内容时: prefix|suffix:将trim标签中内容前面或后面添加指定内容
suffixOverrides|prefixOverrides:将trim标签中内容前面或后面去掉指定内容 若标签中没有内容时,trim标签也没有任何效果
如果 where 元素与你期望的不太一样,你也可以通过自定义 trim 元素来定制 where 元素的功能。比如,和 where 元素等价的自定义 trim 元素为:
Xml<trim prefix="WHERE" prefixOverrides="AND |OR "> ... </trim> -
prefixOverrides 属性会忽略通过管道符分隔的文本序列(注意此例中的空格是必要的)。上述例子会移除所有 prefixOverrides 属性中指定的内容,并且插入 prefix 属性中指定的内容。
用于动态更新语句的类似解决方案叫做 set。set 元素可以用于动态包含需要更新的列,忽略其它不更新的列。比如:
Xml-dtd<update id="updateAuthorIfNecessary"> update Author <set> <if test="username != null">username=#{username},</if> <if test="password != null">password=#{password},</if> <if test="email != null">email=#{email},</if> <if test="bio != null">bio=#{bio}</if> </set> where id=#{id} </update>
这个例子中,set 元素会动态地在行首插入 SET 关键字,并会删掉额外的逗号(这些逗号是在使用条件语句给列赋值时引入的)。
或者,你可以通过使用trim元素来达到同样的效果:
<trim prefix="SET" suffixOverrides=",">
...
</trim>choose、when、otherwise
有时候,我们不想使用所有的条件,而只是想从多个条件中选择一个使用。针对这种情况,MyBatis 提供了 choose 元素,它有点像 Java 中的 switch 语句。
相当于if...else if...else when至少要有一个,otherwise最多只能有一个
<select id="findActiveBlogLike"
resultType="Blog">
SELECT * FROM BLOG WHERE state = ‘ACTIVE’
<choose>
<when test="title != null">
AND title like #{title}
</when>
<when test="author != null and author.name != null">
AND author_name like #{author.name}
</when>
<otherwise>
AND featured = 1
</otherwise>
</choose>
</select>传入了 “title” 就按 “title” 查找,传入了 “author” 就按 “author” 查找的情形。若两者都没有传入,就返回标记为 featured 的 BLOG
foreach
collection:设置需要循环的数组或集合
item:表示数组或集合中的每一个数据 separator:循环体之间的分割符
open:foreach标签所循环的所有内容的开始符 close:foreach标签所循环的所有内容的结束符
/**
* 通过数组实现批量删除
*/
int deleteMoreByArray(@Param("eids") Integer[] eids);<!-- int deleteMoreByArray(@Param("eids") Integer[] eids); -->
<delete id="deleteMoreByArray">
<!--等价于 delete from t_emp where eid = ? or eid=?....-->
delete from t_emp where
<foreach collection="eids" item="eid" separator="or"> eid = #{eid} </foreach>
<!-- delete from t_emp where eid in (?,?,?,,,)
delete from t_emp where eid in
<foreach collection="eids" item="eid" separator="," open="(" close=")">
#{eid}
</foreach>
-->
</delete>两种删除delete的方法:delete from t_emp where eid in (?,?,?,,,)
delete from t_emp where eid = ? or eid=?....
foreach 元素的功能非常强大,它允许你指定一个集合,声明可以在元素体内使用的集合项(item)和索引(index)变量。它也允许你指定开头与结尾的字符串以及集合项迭代之间的分隔符。这个元素也不会错误地添加多余的分隔符,看它多智能!
提示 你可以将任何可迭代对象(如 List、Set 等)、Map 对象或者数组对象作为集合参数传递给 foreach。当使用可迭代对象或者数组时,index 是当前迭代的序号,item 的值是本次迭代获取到的元素。当使用 Map 对象(或者 Map.Entry 对象的集合)时,index 是键,item 是值。
批量添加
<!-- int insertMoreByList(@Param("emps") List<Emp> emps); -->
<insert id="insertMoreByList">
insert into t_emp values
<foreach collection="emps" item="emp" separator=","> (null,#{emp.empName},#{emp.age},#{emp.sex},#{emp.email},null) </foreach>
</insert><!-- /*批量添加*/
int insertMoreByList(@Param("emps") List<Emp> emps);-->
<insert id="insertMoreByList">
insert into t_emp values
<foreach collection="emps" item="emp" separator=",">
(null,#{emp.empName},#{emp.age},#{emp.sex},#{emp.email},null)
</foreach>
</insert>@Test
public void insertMoreByListTest() {
SqlSession sqlSession = SqlsessionUtils.getSqlSession();
DynamicSqlMapper mapper = sqlSession.getMapper(DynamicSqlMapper.class);
Emp emp1 = new Emp(null, "a1", 23, "男", "123@qq.com");
Emp emp2 = new Emp(null,"a2",23,"男","123@qq.com");
Emp emp3 = new Emp(null,"a3",23,"男","123@qq.com");
List<Emp> emps = Arrays.asList(emp1, emp2, emp3);
System.out.println(mapper.insertMoreByList(emps));
}EBUG 02-16 21:12:47,634 ==> Preparing: insert into t_emp values (null,?,?,?,?,null) , (null,?,?,?,?,null) , (null,?,?,?,?,null) (BaseJdbcLogger.java:137)
DEBUG 02-16 21:12:47,673 ==> Parameters: a1(String), 23(Integer), 男(String), 123@qq.com(String), a2(String), 23(Integer), 男(String), 123@qq.com(String), a3(String), 23(Integer), 男(String), 123@qq.com(String) (BaseJdbcLogger.java:137)
DEBUG 02-16 21:12:47,705 <== Updates: 3 (BaseJdbcLogger.java:137)
6、SQL片段
设置SQL片段:<sql id="empColumns">eid,emp_name,age,sex,email</sql> 引用SQL片段:<include refid="empColumns"></include>
比如select *这星号里面是其他标签,可以设置一个sql片段来注入。
<sql id="empColumns">eid,emp_name,age,sex,email</sql>
<!-- List<Emp> getEmpByCondition(Emp emp); -->
<select id="getEmpByCondition" resultType="Emp">
select
<include refid="empColumns"/>
from t_emp
<trim prefix="where" suffixOverrides="and|or">
<if test="empName != null and empName != ''"> emp_name = #{empName} and </if>
<if test="age != null and age != ''"> age = #{age} or </if>
<if test="sex != null and sex != ''"> sex = #{sex} and </if>
<if test="email != null and email != ''"> email = #{email} </if>
</trim>
</select>六.缓存
仅对查询有效
1、MyBatis的一级缓存
一级缓存是SqlSession级别的(默认开启的),通过同一个SqlSession查询的数据会被缓存,下次查询相同的数据,就 会从缓存中直接获取,不会从数据库重新访问
使一级缓存失效的四种情况:
- 不同的SqlSession对应不同的一级缓存
- 同一个SqlSession但是查询条件不同
- 同一个SqlSession两次查询期间执行了任何一次增删改操作
- 同一个SqlSession两次查询期间手动清空了缓存
2、MyBatis的二级缓存
二级缓存是SqlSessionFactory级别,通过同一个SqlSessionFactory创建的SqlSession查询的结果会被 缓存;此后若再次执行相同的查询语句,结果就会从缓存中获取
二级缓存开启的条件:
a>在核心配置文件中,设置全局配置属性cacheEnabled="true",默认为true,不需要设置
b>在映射文件中设置标签
c>二级缓存必须在SqlSession关闭或提交之后有效
d>查询的数据所转换的实体类类型必须实现序列化的接口
使二级缓存失效的情况: 两次查询之间执行了任意的增删改,会使一级和二级缓存同时失效
@Test
public void testTwoCache(){
try {
InputStream is = Resources.getResourceAsStream("mybatis-config.xml");
SqlSessionFactory sqlSessionFactory = new SqlSessionFactoryBuilder().build(is);
SqlSession sqlSession1 = sqlSessionFactory.openSession(true);
CacheMapper mapper1 = sqlSession1.getMapper(CacheMapper.class);
System.out.println(mapper1.getEmpByEid(1));
<!--要符合四个条件
设置全局配置属性cacheEnabled="true",默认为true,不需要设置
在映射文件中设置标签<cache/>
**二级缓存必须在SqlSession关闭或提交之后有效**
查询的数据所转换的实体类类型必须实现序列化的接口
-->
sqlSession1.close();
SqlSession sqlSession2 = sqlSessionFactory.openSession(true);
CacheMapper mapper2 = sqlSession2.getMapper(CacheMapper.class);
System.out.println(mapper2.getEmpByEid(1));
sqlSession2.close();
} catch (IOException e) {
e.printStackTrace();
}
}
3、二级缓存的相关配置
在mapper配置文件中添加的cache标签可以设置一些属性:
eviction属性:缓存回收策略
LRU(Least Recently Used) – 最近最少使用的:移除最长时间不被使用的对象。
FIFO(First in First out) – 先进先出:按对象进入缓存的顺序来移除它们。
SOFT – 软引用:移除基于垃圾回收器状态和软引用规则的对象。
WEAK – 弱引用:更积极地移除基于垃圾收集器状态和弱引用规则的对象。
默认的是 LRU。
flushInterval属性:刷新间隔,单位毫秒
默认情况是不设置,也就是没有刷新间隔,缓存仅仅调用语句时刷新
size属性:引用数目,正整数
代表缓存最多可以存储多少个对象,太大容易导致内存溢出
readOnly属性:只读,true/false
true:只读缓存;会给所有调用者返回缓存对象的相同实例。因此这些对象不能被修改。这提供了 很重要的性能优势。
false:读写缓存;会返回缓存对象的拷贝(通过序列化)。这会慢一些,但是安全,因此默认是 false。
<cache eviction="" flushInterval="" size="" readOnly="" blocking="" type="" />4、MyBatis缓存查询的顺序
先查询二级缓存,因为二级缓存中可能会有其他程序已经查出来的数据,可以拿来直接使用。
如果二级缓存没有命中,再查询一级缓存
如果一级缓存也没有命中,则查询数据库
SqlSession关闭之后,一级缓存中的数据会写入二级缓存
5、整合第三方缓存EHCache
a>添加依赖(放pom中)
<!-- Mybatis EHCache整合包 -->
<dependency>
<groupId>org.mybatis.caches</groupId>
<artifactId>mybatis-ehcache</artifactId>
<version>1.2.1</version>
</dependency>
<!-- slf4j日志门面的一个具体实现 -->
<dependency>
<groupId>ch.qos.logback</groupId>
<artifactId>logback-classic</artifactId>
<version>1.2.3</version>
</dependency>b>各jar包功能
| jar包名称 | 作用 |
|---|---|
| mybatis-ehcache | Mybatis和EHCache的整合包 |
| ehcache | EHCache核心包 |
| slf4j-api | SLF4J日志门面包 |
| logback-classic | 支持SLF4J门面接口的一个具体实现 |
c>创建EHCache的配置文件ehcache.xml
<?xml version="1.0" encoding="utf-8" ?>
<ehcache xmlns:xsi="http://www.w3.org/2001/XMLSchema-instance"
xsi:noNamespaceSchemaLocation="../config/ehcache.xsd">
<!-- 磁盘保存路径 -->
<diskStore path="D:\atguigu\ehcache"/>
<defaultCache
maxElementsInMemory="1000"
maxElementsOnDisk="10000000"
eternal="false"
overflowToDisk="true"
timeToIdleSeconds="120"
timeToLiveSeconds="120"
diskExpiryThreadIntervalSeconds="120"
memoryStoreEvictionPolicy="LRU">
</defaultCache>
</ehcache>
d>设置二级缓存的类型
<cache type="org.mybatis.caches.ehcache.EhcacheCache"/>
e>加入logback日志
存在SLF4J时,作为简易日志的log4j将失效,此时我们需要借助SLF4J的具体实现logback来打印日志。 创建logback的配置文件logback.xml
<?xml version="1.0" encoding="UTF-8"?>
<configuration debug="true">
<!-- 指定日志输出的位置 -->
<appender name="STDOUT"
class="ch.qos.logback.core.ConsoleAppender">
<encoder>
<!-- 日志输出的格式 -->
<!-- 按照顺序分别是:时间、日志级别、线程名称、打印日志的类、日志主体内容、换行 -
->
<pattern>[%d{HH:mm:ss.SSS}] [%-5level] [%thread] [%logger]
[%msg]%n</pattern>
</encoder>
</appender>
<!-- 设置全局日志级别。日志级别按顺序分别是:DEBUG、INFO、WARN、ERROR -->
<!-- 指定任何一个日志级别都只打印当前级别和后面级别的日志。 -->
<root level="DEBUG">
<!-- 指定打印日志的appender,这里通过“STDOUT”引用了前面配置的appender -->
<appender-ref ref="STDOUT" />
</root>
<!-- 根据特殊需求指定局部日志级别 -->
<logger name="com.atguigu.crowd.mapper" level="DEBUG"/>
</configuration>f>EHCache配置文件说明
| 属性名 | 是 否 必 须 | 作用 |
|---|---|---|
| maxElementsInMemory | 是 | 在内存中缓存的element的最大数目 |
| maxElementsOnDisk | 是 | 在磁盘上缓存的element的最大数目,若是0表示无 穷大 |
| eternal | 是 | 设定缓存的elements是否永远不过期。 如果为 true,则缓存的数据始终有效, 如果为false那么还 要根据timeToIdleSeconds、timeToLiveSeconds 判断 |
| overflowToDisk | 是 | 设定当内存缓存溢出的时候是否将过期的element 缓存到磁盘上 |
| timeToIdleSeconds | 否 | 当缓存在EhCache中的数据前后两次访问的时间超 过timeToIdleSeconds的属性取值时, 这些数据便 会删除,默认值是0,也就是可闲置时间无穷大 |
| timeToLiveSeconds | 否 | 缓存element的有效生命期,默认是0.,也就是 element存活时间无穷大 |
| diskSpoolBufferSizeMB | 否 | DiskStore(磁盘缓存)的缓存区大小。默认是 30MB。每个Cache都应该有自己的一个缓冲区 |
| diskPersistent | 否 | 在VM重启的时候是否启用磁盘保存EhCache中的数 据,默认是false。 |
| diskExpiryThreadIntervalSeconds | 否 | 磁盘缓存的清理线程运行间隔,默认是120秒。每 个120s, 相应的线程会进行一次EhCache中数据的 清理工作 |
| memoryStoreEvictionPolicy | 否 | 当内存缓存达到最大,有新的element加入的时 候, 移除缓存中element的策略。 默认是LRU(最 近最少使用),可选的有LFU(最不常使用)和 FIFO(先进先出) |
七.mybatis逆向工程
正向工程:先创建Java实体类,由框架负责根据实体类生成数据库表。Hibernate是支持正向工程 的。
逆向工程:先创建数据库表,由框架负责根据数据库表,反向生成如下资源:
Java实体类
Mapper接口
Mapper映射文件
逆向过程中核心配置文件mybatis-config文件要自己创建
1、创建逆向工程的步骤
a>添加依赖和插件
pom层中
<!-- 依赖MyBatis核心包 -->
<dependencies>
<dependency>
<groupId>org.mybatis</groupId>
<artifactId>mybatis</artifactId>
<version>3.5.7</version>
</dependency>
</dependencies>
<!-- 控制Maven在构建过程中相关配置 -->
<build>
<!-- 构建过程中用到的插件 -->
<plugins>
<!-- 具体插件,逆向工程的操作是以构建过程中插件形式出现的 -->
<plugin>
<groupId>org.mybatis.generator</groupId>
<artifactId>mybatis-generator-maven-plugin</artifactId>
<version>1.3.0</version>
<!-- 插件的依赖 -->
<dependencies>
<!-- 逆向工程的核心依赖 -->
<dependency>
<groupId>org.mybatis.generator</groupId>
<artifactId>mybatis-generator-core</artifactId>
<version>1.3.2</version>
</dependency>
<!-- 数据库连接池 -->
<dependency>
<groupId>com.mchange</groupId>
<artifactId>c3p0</artifactId>
<version>0.9.2</version>
</dependency>
<!-- MySQL驱动 -->
<dependency>
<groupId>mysql</groupId>
<artifactId>mysql-connector-java</artifactId>
<version>5.1.8</version>
</dependency>
</dependencies>
</plugin>
</plugins>
</build>b>创建MyBatis的核心配置文件
c>创建逆向工程的配置文件
文件名必须是:generatorConfig.xml
在resources文件下
<?xml version="1.0" encoding="UTF-8"?>
<!DOCTYPE generatorConfiguration
PUBLIC "-//mybatis.org//DTD MyBatis Generator Configuration 1.0//EN"
"http://mybatis.org/dtd/mybatis-generator-config_1_0.dtd">
<generatorConfiguration>
<!--
targetRuntime: 执行生成的逆向工程的版本
MyBatis3Simple: 生成基本的CRUD(清新简洁版)
MyBatis3: 生成带条件的CRUD(奢华尊享版)
-->
<context id="DB2Tables" targetRuntime="MyBatis3Simple">
<!-- 数据库的连接信息 -->
<jdbcConnection driverClass="com.mysql.jdbc.Driver"
connectionURL="jdbc:mysql://localhost:3306/mybatis"
userId="root"
password="123456">
</jdbcConnection>
<!-- javaBean的生成策略-->
<javaModelGenerator targetPackage="com.atguigu.mybatis.bean"
targetProject=".\src\main\java">
<property name="enableSubPackages" value="true" />
<property name="trimStrings" value="true" />
</javaModelGenerator>
<!-- SQL映射文件的生成策略 -->
<sqlMapGenerator targetPackage="com.atguigu.mybatis.mapper"
targetProject=".\src\main\resources">
<property name="enableSubPackages" value="true" />
</sqlMapGenerator>
<!-- Mapper接口的生成策略 -->
<javaClientGenerator type="XMLMAPPER"
targetPackage="com.atguigu.mybatis.mapper" targetProject=".\src\main\java">
<property name="enableSubPackages" value="true" />
</javaClientGenerator>
<!-- 逆向分析的表 -->
<!-- tableName设置为*号,可以对应所有表,此时不写domainObjectName -->
<!-- domainObjectName属性指定生成出来的实体类的类名 -->
<table tableName="t_emp" domainObjectName="Emp"/>
<table tableName="t_dept" domainObjectName="Dept"/>
</context>
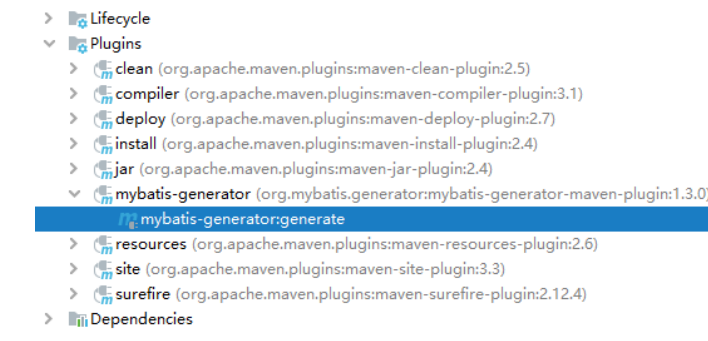
</generatorConfigurationd>执行MBG插件的generate目标
2、QBC查询
八、分页插件
https://pagehelper.github.io/官网
* limit index,pageSize
* index:当前页的起始索引
* pageSize:每页显示的条数
* pageNum:当前页的页码
* index=(pageNum-1)*pageSize
*
* 使用MyBatis的分页插件实现分页功能:
* 1、需要在查询功能之前开启分页
* PageHelper.startPage(int pageNum, int pageSize);
* 2、在查询功能之后获取分页相关信息
* PageInfo<Emp> page = new PageInfo<>(list, 5);
* list表示分页数据
* 5表示当前导航分页的数量
*/1、分页插件使用步骤
a>添加依赖
<!-- https://mvnrepository.com/artifact/com.github.pagehelper/pagehelper -->
<dependency>
<groupId>com.github.pagehelper</groupId>
<artifactId>pagehelper</artifactId>
<version>5.2.0</version>
</dependency>b>配置分页插件
在MyBatis的核心配置文件中配置插件
<plugins>
<!--设置分页插件-->
<plugin interceptor="com.github.pagehelper.PageInterceptor"></plugin>
</plugins>
2、分页插件的使用
a>在查询功能之前使用PageHelper.startPage(int pageNum, int pageSize)开启分页功能
pageNum:当前页的页码
pageSize:每页显示的条数
b>在查询获取list集合之后,使用PageInfo pageInfo = new PageInfo<>(List list, int navigatePages)获取分页相关数据
list:分页之后的数据
navigatePages:导航分页的页码数
c>分页相关数据
PageInfo{
pageNum=8, pageSize=4, size=2, startRow=29, endRow=30, total=30, pages=8,
list=Page{count=true, pageNum=8, pageSize=4, startRow=28, endRow=32, total=30, pages=8,
reasonable=false, pageSizeZero=false},
prePage=7, nextPage=0, isFirstPage=false, isLastPage=true, hasPreviousPage=true, hasNextPage=false, navigatePages=5, navigateFirstPage4, navigateLastPage8, navigatepageNums=[4, 5, 6, 7, 8] }
常用数据:
pageNum:当前页的页码
pageSize:每页显示的条数
size:当前页显示的真实条数
total:总记录数
pages:总页数
prePage:上一页的页码
nextPage:下一页的页码
isFirstPage/isLastPage:是否为第一页/最后一页
hasPreviousPage/hasNextPage:是否存在上一页/下一页
navigatePages:导航分页的页码数
navigatepageNums:导航分页的页码,[1,2,3,4,5]
ABDDBCBCBDB
ACDccbdcddcc
DBBBD
cbbcd