
一、spring
1.Spring简介
Spring是一个开源框架,它由[Rod Johnson](https://baike.baidu.com/item/Rod Johnson)创建。它是为了解决企业应用开发的复杂性而创建的。
目前是JavaEE开发的灵魂框架。他可以简化JavaEE开发,可以非常方便整合其他框架,无侵入的进行功能增强。
Spring的核心就是 控制反转(IoC)和面向切面(AOP) 。
Spring各jar包详解
spring.jar 是包含有完整发布模块的单个jar 包。但是不包括mock.jar,aspects.jar, spring-portlet.jar, and spring-hibernate2.jar。
spring-src.zip就是所有的源代码压缩包。
除了spring.jar 文件,Spring 还包括有其它21 个独立的jar 包,各自包含着对应的Spring组件,用户可以根据自己的需要来选择组合自己的jar 包,而不必引入整个spring.jar的所有类文件。
1.spring-aop
这个jar 文件包含在应用中使用Spring 的AOP 特性时所需的类和源码级元数据支持。
使用基于AOP 的Spring特性,如声明型事务管理(Declarative Transaction Management),也要在应用里包含这个jar包。
外部依赖spring-core, (spring-beans,AOP Alliance, CGLIB,Commons Attributes)。
关于org.springframework.asm
Spring独立的asm程序, Spring2.5.6的时候需要asmJar包,3.0开始提供他自己独立的asmJar。
2.spring-aspects.jar
提供对AspectJ的支持,以便可以方便的将面向方面的功能集成进IDE中,比如Eclipse AJDT。
外部依赖。
3.spring-beans.jar
这个jar 文件是所有应用都要用到的,它包含访问配置文件、创建和管理bean 以及进行Inversion ofControl / Dependency Injection(IoC/DI)操作相关的所有类。如果应用只需基本的IoC/DI 支持,引入spring-core.jar 及spring-beans.jar 文件就可以了。
外部依赖spring-core,(CGLIB)。
4.spring-context.jar
这个jar 文件为Spring 核心提供了大量扩展。可以找到使用Spring ApplicationContext特性时所需的全部类,JDNI 所需的全部类,instrumentation组件以及校验Validation 方面的相关类。
外部依赖spring-beans, (spring-aop)。
5.spring-context-support
包含支持缓存Cache(ehcache)、JCA、JMX、 邮件服务(Java Mail、COS Mail)、任务计划Scheduling(Timer、Quartz)方面的类。
以前的版本中应该是这个:spring-support.jar这个jar 文件包含支持UI模版(Velocity,FreeMarker,JasperReports),邮件服务,脚本服务(JRuby),缓存Cache(EHCache),任务计划Scheduling(uartz)方面的类。
外部依赖spring-context, (spring-jdbc, Velocity,FreeMarker, JasperReports, BSH, Groovy,JRuby, Quartz, EHCache)
6.spring-core.jar
这个jar 文件包含Spring 框架基本的核心工具类。Spring 其它组件要都要使用到这个包里的类,是其它组件的基本核心,当然你也可以在自己的应用系统中使用这些工具类。
外部依赖Commons Logging, (Log4J)。
7.spring-expression
Spring表达式语言。
8.spring-instrument
Spring3.0对服务器的代理接口。
9. spring-instrument-tomcat
Spring3.0对Tomcat的连接池的集成。
10.spring-jdbc.jar
这个jar 文件包含对Spring 对JDBC 数据访问进行封装的所有类。
外部依赖spring-beans,spring-dao。
11.spring-jms.jar
这个jar包提供了对JMS 1.0.2/1.1的支持类。
外部依赖spring-beans,spring-dao,JMS API。
此外,还有下面这些以spring-j*开头的包,本人还没用过。
spring-jmx.jar
这个jar包提供了对JMX 1.0/1.2的支持类。外部依赖spring-beans,spring-aop, JMX API。
spring-jca.jar
对JCA 1.0的支持。外部依赖spring-beans,spring-dao, JCA API。
spring-jdo.jar
对JDO 1.0/2.0的支持。外部依赖spring-jdbc, JDO API, (spring-web)。
spring-jpa.jar
对JPA 1.0的支持。外部依赖spring-jdbc, JPA API, (spring-web)。
12.spring-messaging
spring-messaging模块为集成messaging api和消息协议提供支持
参考 http://www.cnblogs.com/davidwang456/p/4446796.html
13. spring-orm
包含Spring对DAO特性集进行了扩展,使其支持iBATIS、JDO、OJB、TopLink, 因为Hibernate已经独立成包了,现在不包含在这个包里了。这个jar文件里大部分的类都要依赖spring-dao.jar里的类,用这个包时你需要同时包含spring-dao.jar包。
14. spring-oxm
Spring 对Object/XMl的映射支持,可以让Java与XML之间来回切换。
15.spring-test
对Junit等测试框架的简单封装。
16.spring-tx
以前是在这里org.springframework.transaction
为JDBC、Hibernate、JDO、JPA、Beans等提供的一致的声明式和编程式事务管理支持。
17.spring-web.jar
这个jar 文件包含Web 应用开发时,用到Spring 框架时所需的核心类,包括自动载入Web ApplicationContext 特性的类、Struts 与JSF 集成类、文件上传的支持类、Filter 类和大量工具辅助类。
外部依赖spring-context, Servlet API, (JSP API, JSTL,Commons FileUpload, COS)。
org.springframework.web.portlet
SpringMVC的增强。
org.springframework.web.servlet
对J2EE6.0的Servlet3.0的支持。
org.springframework.web.struts
Struts框架支持,可以更方便更容易的集成Struts框架。
18.spring-webmvc.jar
这个jar 文件包含Spring MVC 框架相关的所有类。包括框架的Servlets,Web MVC框架,控制器和视图支持。当然,如果你的应用使用了独立的MVC 框架,则无需这个JAR 文件里的任何类。
外部依赖spring-web, (spring-support,Tiles,iText,POI)。
19.spring-webmvc-protlet
20.spring-websocket
21.spring-dao
这个jar文件包含Spring DAO、Spring Transaction进行数据访问的所有类。为了使用声明型事务支持,还需在自己的应用里包含spring-aop.jar。
关于spring-dao.jar(3.x版本里,没有发现这个包)
外部依赖spring-core,(spring-aop, spring-context, JTA API)。
22.spring-remoting
这个jar文件包含支持EJB、远程调用Remoting(RMI、Hessian、Burlap、Http Invoker、JAX-RPC)方面的类。
外部依赖spring-aop, (spring-context,spring-web,Hessian,Burlap,JAX-RPC,EJB API)。
23.spring-portlet.jar
spring自己实现的一个类似Spring MVC的框架。包括一个MVC框架和控制器。 外部依赖spring-web, Portlet API,(spring-webmvc)。
Spring与其他框架整合的jar包
spring-hibernate2.jar
对Hibernate 2.1的支持,已经不建议使用。外部依赖spring-jdbc,Hibernate2,(spring-web)。
spring-hibernate3.jar
对Hibernate 3.0/3.1/3.2的支持。外部依赖spring-jdbc,Hibernate3,(spring-web)。
目前的Spring对Hibernate的支持比较好,直接用spring-orm包即可,一般不用单独添加spring-hibernate包。
spring-toplink.jar
对TopLink框架的支持。外部依赖spring-jdbc,TopLink。
spring-ibatis.jar
对iBATIS SQL Maps的支持。外部依赖spring-jdbc,iBATIS SQL Maps。
*spring-jmx.jar*
这个jar包提供了对JMX 1.0/1.2的支持类。 外部依赖spring-beans,spring-aop, JMXAPI。
spring-jms.jar
这个jar包提供了对JMS 1.0.2/1.1的支持类。 外部依赖spring-beans,spring-dao,JMS API。
*spring-jca.jar*
对JCA 1.0的支持。 外部依赖spring-beans,spring-dao, JCAAPI。
spring-jdo.jar
对JDO 1.0/2.0的支持。 外部依赖spring-jdbc, JDO API, (spring-web)。
*spring-jpa.jar*
对JPA 1.0的支持。 外部依赖spring-jdbc, JPA API,(spring-web)
另外的三个包。
spring-mock.jar
这个jar 文件包含Spring 一整套mock 类来辅助应用的测试。Spring 测试套件使用了其中大量mock 类,这样测试就更加简单。模拟HttpServletRequest 和HttpServletResponse 类在Web 应用单元测试是很方便的。并且提供了对JUnit的支持。
外部依赖spring-core。
WEAVER JARS (dist/weavers)说明。
spring-agent.jar
Spring的InstrumentationSavingAgent (为InstrumentationLoadTimeWeaver),一个设备代理包,可以参考JDK1.5的Instrumentation功能获得更多信息。
外部依赖none (for use at JVM startup:"-javaagent:spring-agent.jar")。
spring-tomcat-weaver.jar
扩展Tomcat的ClassLoader,使其可以使用instrumentation(设备)类。
外部依赖none (for deployment into Tomcat's"server/lib" directory)。
如果需要使用JSP语言作为Spring's web MVC tags的参数,则需要JSP 2.0的支持。或者选择Jakarta的JSTL (standard.jar)。
如何选择这些发布包,决定选用哪些发布包其实相当简单。
如果你正在构建Web 应用并将全程使用Spring,那么最好就使用单个全部的spring.jar 文件;
如果你的应用仅仅用到简单的Inversion ofControl / Dependency Injection(IoC/DI)容器,那么只需spring-core.jar与spring-beans.jar 即可;
如果你对发布的大小要求很高,那么就得精挑细选了,只取包含自己所需特性的jar 文件了。
采用独立的发布包你可以避免包含自己的应用不需要的全部类。当然你可以采用其它的一些工具来设法令整个应用包变小,节省空间的重点在于准确地找出自己所需的Spring 依赖类,然后合并所需的类与包就可以了。
Eclispe 有个插件叫ClassPathHelper 可以帮你找找所依赖的类。
Spring AOP:Spring的面向切面编程,提供AOP(面向切面编程)的实现 Spring Aspects:Spring提供的对AspectJ框架的整合 Spring Beans:Spring IOC的基础实现,包含访问配置文件、创建和管理bean等。 Spring Context:在基础IOC功能上提供扩展服务,此外还提供许多企业级服务的支持,有邮件服务、任务调度、JNDI定位,EJB集成、远程访问、缓存以及多种视图层框架的支持。 Spring ContextSupport:Springcontext的扩展支持,用于MVC方面。 Spring Core:Spring的核心工具包 Spring expression:Spring表达式语言 Spring FrameworkBom: Spring Instrument:Spring对服务器的代理接口 Spring InstrumentTomcat:Spring对tomcat连接池的集成 Spring JDBC:对JDBC 的简单封装 Spring JMS:为简化jms api的使用而做的简单封装 Spring Messaging: Spring orm:整合第三方的orm实现,如hibernate,ibatis,jdo以及spring 的jpa实现 Spring oxm:Spring对于object/xml映射的支持,可以让JAVA与XML之间来回切换 Spring test:对JUNIT等测试框架的简单封装 Spring tx:为JDBC、Hibernate、JDO、JPA等提供的一致的声明式和编程式事务管理。 Spring web:包含Web应用开发时,用到Spring框架时所需的核心类,包括自动载入WebApplicationContext特性的类、Struts与JSF集成类、文件上传的支持类、Filter类和大量工具辅助类。 Spring webmvc:包含SpringMVC框架相关的所有类。包含国际化、标签、Theme、视图展现的FreeMarker、JasperReports、Tiles、Velocity、XSLT相关类。当然,如果你的应用使用了独立的MVC框架,则无需这个JAR文件里的任何类。 Spring webmvcportlet:SpringMVC的增强 Spring websocket:
转自 http://www.cnblogs.com/yanjunwu/archive/2013/04/06/3001927.html
Spring——jar包详解(其他参考)
org.springframework.aop——Spring的面向切面编程,提供AOP(面向切面编程)的实现
org.springframework.asm——spring2.5.6的时候需要asm jar包,spring3.0开始提供它自己独立的asm jar包
org.springframework.aspects——Spring提供的对AspectJ框架的整合
org.springframework.beans——所有应用都用到,包含访问配置文件,创建和管理bean等,是Spring IOC的基础实现。
org.springframework.context.support——Springcontext的扩展支持,用于MVC方面
org.springframework.context——提供在基础IOC功能上的扩展服务,此外还提供许多企业级服务的支持,有邮件服务、任务调度、JNDI定位,EJB集成、远程访问、缓存以及多种视图层框架的支持。
org.springframework.core——Spring的核心工具包,其他包依赖此包
org.springframework.expression——Spring表达式语言
org.springframework.instrument.tomcat——Spring对tomcat连接池的集成
org.springframework.instrument——Spring对服务器的代理接口
org.springframework.jdbc——对JDBC 的简单封装
org.springframework.jms——为简化jms api的使用而做的简单封装
org.springframework.orm——整合第三方的orm实现,如hibernate,ibatis,jdo以及spring 的jpa实现
org.springframework.oxm——Spring对于object/xml映射的支持,可以让JAVA与XML之间来回切换
org.springframework.test——对JUNIT等测试框架的简单封装
org.springframework.transaction——为JDBC,HIBERNATE,JDO和JPA提供的一致性的声明式和简单编程式事务管理
org.springframework.web.portlet——SpringMVC的增强
org.springframework.web.servlet——对J2EE6.0servlet3.0的支持
org.springframework.web.struts——整合struts框架的支持,可以更方便更容易的集成Struts框架。
org.springframework.web——包含Web应用开发时,用到Spring框架时所需的核心类,包括自动载入WebApplicationContext特性的类、Struts与JSF集成类、文件上传的支持类、Filter类和大量工具辅助类。
Spring包依赖说明:
\1) spring-core.jar需commons-collections.jar,spring-core.jar是以下其它各个的基本。 \2) spring-beans.jar需spring-core.jar,cglib-nodep-2.1_3.jar \3) spring-aop.jar需spring-core.jar,spring-beans.jar,cglib-nodep-2.1_3.jar,aopalliance.jar \4) spring-context.jar需spring-core.jar,spring-beans.jar,spring-aop.jar,commons-collections.jar,aopalliance.jar \5) spring-dao.jar需spring-core.jar,spring-beans.jar,spring-aop.jar,spring-context.jar \6) spring-jdbc.jar需spring-core.jar,spring-beans.jar,spring-dao.jar \7) spring-web.jar需spring-core.jar,spring-beans.jar,spring-context.jar \8) spring-webmvc.jar需spring-core.jar/spring-beans.jar/spring-context.jar/spring-web.jar \9) spring -hibernate.jar需spring-core.jar,spring-beans.jar,spring-aop.jar,spring-dao.jar,spring-jdbc.jar,spring-orm.jar,spring-web.jar,spring-webmvc.jar \10) spring-orm.jar需spring-core.jar,spring-beans.jar,spring-aop.jar,spring-dao.jar,spring-jdbc.jar,spring-web.jar,spring-webmvc.jar \11) spring -remoting.jar需spring-core.jar,spring-beans.jar,spring-aop.jar,spring-dao.jar,spring-context.jar,spring-web.jar,spring-webmvc.jar \12) spring-support.jar需spring-core.jar,spring-beans.jar,spring-aop.jar,spring-dao.jar,spring-context.jar,spring-jdbc.jar \13) spring-mock.jar需spring-core.jar,spring-beans.jar,spring-dao.jar,spring-context.jar,spring-jdbc.jar
2.IOC控制反转
2.1 概念
控制反转,之前对象的控制权在类手上,现在反转后到了Spring手上。
例如:javaweb中创建对象并使用其对象
过程:
1.首先创造一个dao层的实体类
2.写该实体类的接口
3.实现实体类接口
4.写实体类服务层接口
5.最后写服务层实现类
但是现在只需要创建maven工程,在pom.xml中导入相关依赖
①导入依赖
导入SpringIOC相关依赖
<dependency>
<groupId>org.springframework</groupId>
<artifactId>spring-context</artifactId>
<version>5.1.9.RELEASE</version>
</dependency>②编写一个实体类
public class Hello {
private String name;
public String getName() {
return name;
}
public void setName(String name) {
this.name = name;
}
public void show(){
System.out.println("Hello,"+ name );
}
}
③编写配置文件
在resources目录下创建applicationContext.xml文件,文件名可以任意取。但是建议叫applicationContext。
<?xml version="1.0" encoding="UTF-8"?>
<beans xmlns="http://www.springframework.org/schema/beans"
xmlns:xsi="http://www.w3.org/2001/XMLSchema-instance"
xsi:schemaLocation="http://www.springframework.org/schema/beans http://www.springframework.org/schema/beans/spring-beans.xsd">
<!--
classs:配置类的全类名
id:配置一个唯一标识
-->
<bean id="hello" class="com.study.dao.Hello">
<property name="name" value="Spring"/>
</bean>
</beans>
④创建容器从容器中获取对象并测试
public static void main(String[] args) {
/ //解析beans.xml文件 , 生成管理相应的Bean对象
ApplicationContext context = new ClassPathXmlApplicationContext("beans.xml");
//getBean : 参数即为spring配置文件中bean的id .
Hello hello = (Hello) context.getBean("hello");
hello.show();
}
分析:
//1.实体类Hello
//2.1原来的需要new一个实体对象来获取实体类的set/get及其他方法
Hello hello1 = new Hello();
hello1.setName("spring");
hello1.show();
//2.2现在可以在xml文件中配置bean,即映射对象
<bean id="hello" class="com.study.dao.Hello">
//id为读取该对象的标识,class为反射的地址
//现在创建对象,只需要创建spring容器,再用getBean()方法来读取id创建对象
ApplicationContext context = new ClassPathXmlApplicationContext("beans.xml");
Hello hello = (Hello) context.getBean("hello");
//再正常调用其方法即可
hello.show();2.2 Bean的常用属性配置
2.2.1 id
bean的唯一标识,同一个Spring容器中不允许重复
2.2.2 class
全类名,用于反射创建对象
2.2.3 scope
scope主要有两个值:singleton和prototype
如果设置为singleton则一个容器中只会有这个一个bean对象。默认容器创建的时候就会创建该对象,相对于单例模式
如果设置为prototype则一个容器中会有多个该bean对象。每次调用getBean方法获取时都会创建一个新对象,原型模式
2.3 bean的配置
| bean标签 | 描述 |
|---|---|
| id | 给对象在容器中提供一个唯一标识。用于获取对象 |
| class | 指定类的全限定类名。用于反射创建对象。默认情况下调用无参构造函数 |
| scope | 指定对象的作用范围。 |
| name | 给bean取名 |
| lazy-init | 控制bean的创建时间,如果设置为true就是在第一次获取该对象的时候才去创建 |
| init-method | 设置初始化方法,设置完后容器创建完对象就会自动帮我们调用对应的方法,注意:配置的初始化方法只能是空参的。 |
| destroy-method | 设置销毁之前调用的方法,设置完后容器销毁对象前就会自动帮我们调用对应的方法 |
| factory-bean | 使用工厂类来创建对象放入Spring容器的时,factory-bean 用来指定使用哪个工厂对象 |
| factory-method | factory-method 用来指定使用哪个工厂方法 |
| parent | 在bean标签的属性中有一个parent属性,可以实现配置信息的属性的重用[只是信息的重用,并不是类的继承] |
| abstract | 在bean标签的属性中有一个abstract属性,该属性的值为true的时候表示该bean组件专门用来给别的bean组件来’继承‘的,而且这个被声明为abstract的时候就不能被获取了,要不然会报错 |
| depends-on | depend-on属性来设置当前bean的依赖于哪些bean |
| primary | 指定当前bean为主要候选者 |
| autowire-candidate | 设置当前bean在被其他对象作为自动注入对象的时候,是否作为候选bean,默认值是true。 |
| autowire | 自动装配,属性有byName/byType |
2.3.1 name
可以为当前Bean指定多个别名,根据别名也可以获得Bean对象
<bean id="userService" name="aaa,bbb" class="com.itheima.service.impl.UserServiceImpl"/>此时多个名称都可以获得UserDaoImpl实例对象
applicationContext.getBean("userService");
applicationContext.getBean("aaa");
applicationContext.getBean("bbb");id与name同时定义时,id会转为beanName存到容器中,别名会存到aliasMap中
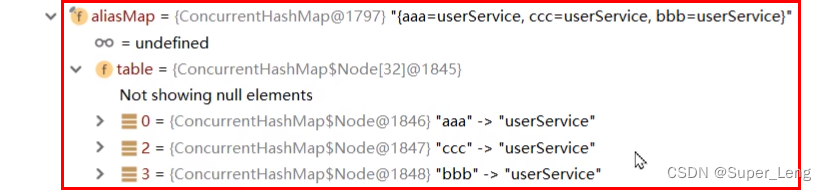
如果不配id,只配name,则容器中会存第一个别名作为beanName
<bean name="aaa,bbb" class="com.itheima.dao.impl.UserDaoImpl"/>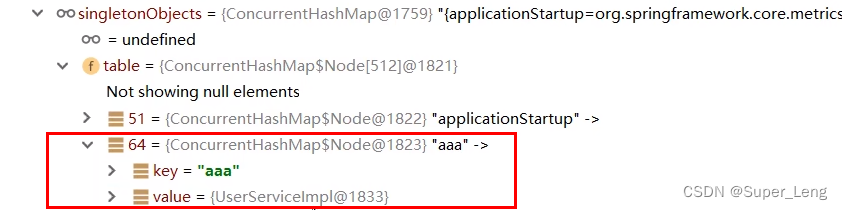
2.3.2 lazy-init
当lazy-init设置为true时为延迟加载,也就是当Spring容器创建的时候,不会立即创建Bean实例,等待用到时在创建Bean实例并存储到单例池中去,后续在使用该Bean直接从单例池获取即可,本质上该Bean还是单例的。
<bean id="userDao" class="com.itheima.dao.impl.UserDaoImpl" lazy-init="true"/>2.3.3 init-method
可以用来设置初始化方法,设置完后容器创建完对象就会自动帮我们调用对应的方法。
@Data
@NoArgsConstructor
@AllArgsConstructor
public class Student {
private String name;
private int id;
private int age;
//初始化方法
public void init(){
System.out.println("对学生对象进行初始化操作");
}
}<bean class="com.sangeng.domain.Student" id="student" init-method="init"></bean>注意:配置的初始化方法只能是空参的。
2.3.4destroy-method
可以用来设置销毁之前调用的方法,设置完后容器销毁对象前就会自动帮我们调用对应的方法。
@Data
@NoArgsConstructor
@AllArgsConstructor
public class Student {
private String name;
private int id;
private int age;
public void init(){
System.out.println("对学生对象进行初始化操作");
}
public void close(){
System.out.println("对象销毁之前调用,用于释放资源");
}
}<bean class="com.sangeng.domain.Student" id="student" destroy-method="close"></bean>注意:配置的方法只能是空参的。
2.3.5 factory-bean&factory-method
这个方法要引入设计模式中的工厂模式,在工厂模式中会在目录中创建一个factory包,里面会创建各种“零件”对象,在工厂包中产生产品。
本质就是多个实体类
2.3.5.1 配置实例工厂创建对象
配置文件中进行配置
<!--创建实例工厂-->
<bean class="com.sangeng.factory.CarFactory" id="carFactory"></bean>
<!--使用实例工厂创建Car放入容器-->
<!--factory-bean 用来指定使用哪个工厂对象-->
<!--factory-method 用来指定使用哪个工厂方法-->
<bean factory-bean="carFactory" factory-method="getCar" id="car"></bean>创建容器获取对象测试
ClassPathXmlApplicationContext app = new ClassPathXmlApplicationContext("applicationContext.xml");
//获取car对象
Car c = (Car) app.getBean("car");
System.out.println(c);2.3.5.2 配置静态工厂创建对象
配置文件中进行配置
<!--创建实例工厂-->
<bean class="com.sangeng.factory.CarFactory" id="carFactory"></bean>
<!--使用实例工厂创建Car放入容器-->
<!--factory-bean 用来指定使用哪个工厂对象-->
<!--factory-method 用来指定使用哪个工厂方法-->
<bean factory-bean="carFactory" factory-method="getCar" id="car"></bean>创建容器获取对象测试
ClassPathXmlApplicationContext app = new ClassPathXmlApplicationContext("applicationContext.xml");
//获取car对象
Car c = (Car) app.getBean("car");
System.out.println(c);实例工厂和静态工厂的区别:
对象方法和静态方法的区别
2.3.6 parent
在bean标签的属性中有一个parent属性,可以实现配置信息的属性的重用[只是信息的重用,并不是类的继承]
2.3.7 abstract
在bean标签的属性中有一个abstract属性,该属性的值为true的时候表示该bean组件专门用来给别的bean组件来’继承‘的,而且这个被声明为abstract的时候就不能被获取了,要不然会报错
2.3.8 depends-on
如果xml中定义的bean特别多,而有些bean之间也没有强依赖关系,此时如果想去调整bean的创建和销毁的顺序,得去调整xml中bean的定义顺序,或者去加强依赖,这样是非常不好的,spring中可以通过depend-on来解决这些问题,在不调整bean的定义顺序和强加依赖的情况下,可以通过通过depend-on属性来设置当前bean的依赖于哪些bean,那么可以保证depend-on指定的bean在当前bean之前先创建好,销毁的时候在当前bean之后进行销毁。
-
depend-on使用方式:
-
Xml
<bean id="bean1" class="" depend-on="bean2,bean3; bean4" />
depend-on:设置当前bean依赖的bean名称,可以指定多个,多个之间可以用”,;空格“进行分割
上面不管bean2,bean2,bean4在任何地方定义,都可以确保在bean1创建之前,会先将bean2,bean3,bean4创建好,表示bean1依赖于这3个bean,可能bean1需要用到bean2、bean3、bean4中生成的一些资源或者其他的功能等,但是又没有强制去在bean1类中通过属性定义强依赖的方式去依赖于bean2、bean3、bean4;当然销毁的时候也会先销毁当前bean,再去销毁被依赖的bean,即先销毁bean1,再去销毁depend-on指定的bean。
2.3.9 primary
当希望从容器中获取到一个bean对象的时候,容器中却找到了多个匹配的bean,此时spring不知道如何选择了,处于懵逼状态,就会报异常。 spring中可以通过bean元素的primary属性来解决这个问题,可以通过这个属性来指定当前bean为主要候选者,当容器查询一个bean的时候,如果容器中有多个候选者匹配的时候,此时spring会返回主要的候选者。
<bean id="bean1" class="" primary="true" />2.3.10 autowire-candidate
设置当前bean在被其他对象作为自动注入对象的时候,是否作为候选bean,默认值是true。
这个属性是与autowire和primary共同使用,例如:
在一个bean对象下使用autowire中的ByType自动装配,但是类型出现重复,用primary指定一个bean或把 一个bean中的autowire-candidate设为true,将其余的满足条件的bean的autowire-candidate置为false,此时也可以解决这个问题
- utowire-candidates属性解析
beans元素是xml中定义bean的根元素,beans元素有个default-autowire-candidates属性,用于定义哪些bean可以作为候选者,default-autowire-candidates的值是个通配符如:
default-autowire-candidates="*Service"再来说一下bean元素的autowire-candidate属性,这个属性有3个可选值:
- default:这个是默认值,autowire-candidate如果不设置,其值就是default
- true:作为候选者
- false:不作为候选者
2.3.11 autowire
由于在手动配置xml过程中,常常发生字母缺漏和大小写等错误,而无法对其进行检查,使得开发效率降低。
采用自动装配将避免这些错误,并且使配置简单化。
再来说一下bean元素的autowire属性,这个属性有2个可选值:
- byName:按名称自动装配
- byType:按类型自动装配
注意点:
当一个bean节点带有 autowire byName的属性时。
- 将查找其类中所有的set方法名,例如setCat,获得将set去掉并且首字母小写的字符串,即cat。
- 去spring容器中寻找是否有此字符串名称id的对象。
- 如果有,就取出注入;如果没有,就报空指针异常。
使用autowire byType首先需要保证:同一类型的对象,在spring容器中唯一。如果不唯一,会报不唯一的异常。
2.4 Spring的其他配置标签
Spring 的 xml 标签大体上分为两类,一种是默认标签,一种是自定义标签 ⚫ 默认标签:就是不用额外导入其他命名空间约束的标签,例如 < bean> 标签 ⚫ 自定义标签:就是需要额外引入其他命名空间约束,并通过前缀引用的标签,例如 < context:property-placeholder/> 标签
Spring的默认标签用到的是Spring的默认命名空间
<?xml version="1.0" encoding="UTF-8"?>
<!--xmlns:ns是namespace的缩写-->
<beans xmlns="http://www.springframework.org/schema/beans"
xmlns:xsi="http://www.w3.org/2001/XMLSchema-instance"
xsi:schemaLocation="http://www.springframework.org/schema/beans
http://www.springframework.org/schema/beans/spring-beans.xsd">
</beans>该命名空间约束下的默认标签如下:

< beans>标签,除了经常用的做为根标签外,还可以嵌套在根标签内,使用profile属性切换开发环境
<!-- 配置测试环境下,需要加载的Bean实例 -->
<beans profile="test">
</beans>
<!-- 配置开发环境下,需要加载的Bean实例 -->
<beans profile="dev">
</beans>可以使用以下两种方式指定被激活的环境: ⚫ 使用命令行动态参数,虚拟机参数位置加载 -Dspring.profiles.active=test ⚫ 使用代码的方式设置环境变量 System.setProperty(“spring.profiles.active”,“test”)
< import>标签,用于导入其他配置文件,项目变大后,就会导致一个配置文件内容过多,可以将一个配置文件根据业务模块进行拆分,拆分后,最终通过< import>标签导入到一个主配置文件中,项目加载主配置文件就连同< import> 导入的文件一并加载了
<!--导入用户模块配置文件-->
<import resource="classpath:UserModuleApplicationContext.xml"/>
<!--导入商品模块配置文件-->
<import resource="classpath:ProductModuleApplicationContext.xml"/>< alias> 标签是为某个Bean添加别名,与在< bean> 标签上使用name属性添加别名的方式一样,我们为UserServiceImpl指定四个别名:aaa、bbb、xxx、yyy
<bean id="userService" name="aaa,bbb" class="com.itheima.service.impl.UserServiceImpl">
<property name="userDao" ref="userDao"/>
</bean>
<!--指定别名-->
<alias name="userService" alias="xxx"/>
<alias name="userService" alias="yyy"/>断点调试,在beanFactory中维护着一个名为aliasMap的Map<String,String>集合,存储别名和beanName之间的映射关系
Spring的自定义标签需要引入外部的命名空间,并为外部的命名空间指定前缀,使用 <前缀:标签> 形式的标签,称之为自定义标签,自定义标签的解析流程也是 Spring xml扩展点方式之一。
<!--默认标签-->
<bean id="userDao" class="com.itheima.dao.impl.UserDaoImpl"/>
<!--自定义标签-->
<context:property-placeholder/>
<mvc:annotation-driven/>
<dubbo:application name="application"/>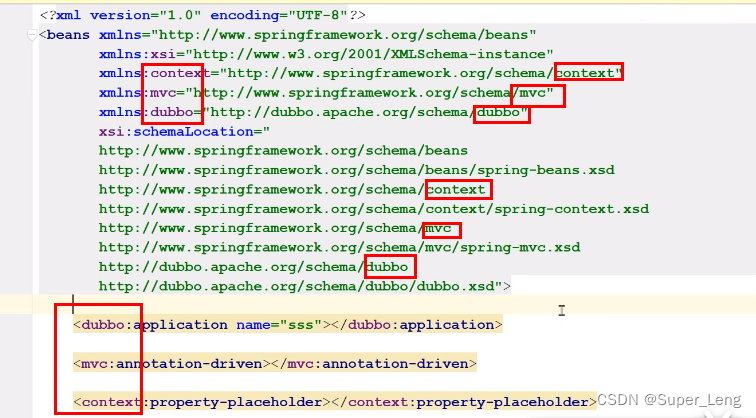
3.DI依赖注入
依赖注入可以理解成IoC的一种应用场景,反转的是对象间依赖关系维护权。
Bean的依赖注入的方式有两种:

其中,ref 是 reference 的缩写形式,翻译为:涉及,参考的意思,用于引用其他Bean的id。value 用于注入普通属性值。
依赖注入的数据类型有如下三种: ⚫ 普通数据类型,例如:String、int、boolean等,通过value属性指定。 ⚫ 引用数据类型,例如:UserDaoImpl、DataSource等,通过ref属性指定。 ⚫ 集合数据类型,例如:List、Map、Properties等。
3.1 set方法注入
在要注入属性的bean标签中进行配置。前提是该类有提供属性对应的set方法,如果属性是boolean类型 , 没有set方法
package com.sangeng.domain;
public class Student {
private String name;
private int id;
private int age;
private Dog dog;
public Dog getDog() {
return dog;
}
public void setDog(Dog dog) {
this.dog = dog;
}
@Override
public String toString() {
return "Student{" +
"name='" + name + '\'' +
", id=" + id +
", age=" + age +
'}';
}
public Student() {
}
public Student(String name, int id, int age) {
this.name = name;
this.id = id;
this.age = age;
}
public String getName() {
return name;
}
public void setName(String name) {
this.name = name;
}
public int getId() {
return id;
}
public void setId(int id) {
this.id = id;
}
public int getAge() {
return age;
}
public void setAge(int age) {
this.age = age;
}
} <bean class="com.sangeng.domain.Dog" id="dog">
<property name="name" value="小白"></property>
<property name="age" value="6"></property>
</bean>
<bean class="com.sangeng.domain.Student" id="student" >
<!--
name属性用来指定要设置哪个属性
value属性用来设置要设置的值
ref属性用来给引用类型的属性设置值,可以写上Spring容器中bean的id
-->
<property name="name" value="东南枝"></property>
<property name="age" value="20"></property>
<property name="id" value="1"></property>
<property name="dog" ref="dog"></property>
</bean>3.2 有参构造注入
在要注入属性的bean标签中进行配置。前提是该类有提供对应的有参构造。
public class Student {
private String name;
private int id;
private int age;
private Dog dog;
public Student(String name, int id, int age, Dog dog) {
this.name = name;
this.id = id;
this.age = age;
this.dog = dog;
}
//.....省略其他
} <!--使用有参构造进行注入有三种方式编写-->
<!-- 第一种根据index参数下标设置 -->
<bean class="com.sangeng.domain.Student" id="student2" >
<!-- index指构造方法 , 下标从0开始 -->
<constructor-arg index="0" value="kuangshen2"/>
</bean>
<!-- 第二种根据参数名字设置 -->
<bean class="com.sangeng.domain.Student" id="student2" >
<!-- name指参数名 -->
<constructor-arg name="name" value="自挂东南枝"></constructor-arg>
<constructor-arg name="age" value="20"></constructor-arg>
<constructor-arg name="id" value="30"></constructor-arg>
<constructor-arg name="dog" ref="dog"></constructor-arg>
</bean>
<!-- 第三种根据参数类型设置 -->
<bean id="userT" class="com.kuang.pojo.UserT">
<constructor-arg type="java.lang.String" value="kuangshen2"/>
</bean>
3.3 读取properties
我们可以让Spring读取properties文件中的key/value,然后使用其中的值
设置读取properties
在Spring配置文件中加入如下标签:指定要读取的文件的路径。
<context:property-placeholder location="classpath:filename.properties">其中的classpath表示类加载路径下。
我们也会用到如下写法:classpath:**.properties 其中的* * 表示文件名任意。
注意:context命名空间的引入是否正确
②使用配置文件中的值
在我们需要使用的时候可以使用${key}来表示具体的值。注意要再value属性中使用才可以。例如:
<property name="propertyName" value="${key}"/>Properties注入
<property name="info">
<props>
<prop key="学号">20190604</prop>
<prop key="性别">男</prop>
<prop key="姓名">小明</prop>
</props>
</property>3.4 复杂类型注入
实体类:
@Data
@NoArgsConstructor
@AllArgsConstructor
public class User {
private int age;
private String name;
private Phone phone;
private List<String> list;
private List<Phone> phones;
private Set<String> set;
private Map<String, Phone> map;
private int[] arr;
private Properties properties;
}
@Data
@NoArgsConstructor
@AllArgsConstructor
public class Phone {
private double price;
private String name;
private String password;
private String path;
}配置如下:(仔细看)
<?xml version="1.0" encoding="UTF-8"?>
<beans xmlns="http://www.springframework.org/schema/beans"
xmlns:xsi="http://www.w3.org/2001/XMLSchema-instance"
xsi:schemaLocation="http://www.springframework.org/schema/beans http://www.springframework.org/schema/beans/spring-beans.xsd">
<bean class="com.sangeng.domain.Phone" id="phone">
<!--phone实体类中基本类型注入-->
<property name="price" value="3999"></property>
<property name="name" value="黑米"></property>
<property name="password" value="123"></property>
<property name="path" value="qqqq"></property>
</bean>
<bean class="com.sangeng.domain.User" id="user">
<property name="age" value="10"></property>
<property name="name" value="大队长"></property>
<!--user实体类中phone实体类注入,用ref-->
<property name="phone" ref="phone"></property>
<!--list集合注入,里面的数据类型为基本类型-->
<property name="list">
<list>
<value>三更</value>
<value>西施</value>
</list>
</property>
<!--list集合注入,里面的数据类型为引用类型-->
<property name="phones">
<list>
<ref bean="phone"></ref>
</list>
</property>
<!--set集合注入,里面的数据类型为基本类型-->
<property name="set">
<set>
<value>setEle1</value>
<value>setEle2</value>
</set>
</property>
<!--map集合注入,key为基本类型,value为引用类型-->
<property name="map">
<map>
<entry key="k1" value-ref="phone"></entry>
<entry key="k2" value-ref="phone"></entry>
</map>
</property>
<!--arr数组注入,里面的数据类型为基本类型-->
<property name="arr">
<array>
<value>10</value>
<value>11</value>
</array>
</property>
<!--properties类型注入,里面的数据类型为引用类型-->
<property name="properties">
<props>
<prop key="k1">v1</prop>
<prop key="k2">v2</prop>
</props>
</property>
<!--Null注入-->
<property name="wife"><null/></property>
</bean>
</beans>
3.5 p命名和c命名注入
1、P命名空间注入 : 需要在头文件中加入约束文件
导入约束 : xmlns:p="http://www.springframework.org/schema/p"
<!--xmlns:ns是namespace的缩写-->
<!--P(属性: properties)命名空间 , 直接注入属性-->
<bean id="user" class="com.kuang.pojo.User" p:name="狂神" p:age="18"/>2、c 命名空间注入 : 需要在头文件中加入约束文件
导入约束 : xmlns:c="http://www.springframework.org/schema/c"
<!--C(构造: Constructor)命名空间 , 使用构造器注入-->
<bean id="user" class="com.kuang.pojo.User" c:name="狂神" c:age="18"/>3.6 bean子标签总结(也有三级及以下子标签)
| bean的子标签 | 子标签描述 | 属性 | 属性描述 |
|---|---|---|---|
| name | 属性的名称对应pojo层中类中属性名 | ||
| 1.property标签 | 用于设置一个属性 | value | 指定bean的属性值。BeanFactory将自动根据Java Bean对应的属性类型加以匹配。如果需要将属性值设定为null,必须使用节点即。 |
| ref | 指定了属性对BeanFactory中其他Bean的引用关系。 | ||
| 2.value标签 | 指定bean的属性值 | 无 | |
| bean | 指定了属性对BeanFactory中其他Bean的引用关系 | ||
| 3.ref 标签 | 填入引用类型(即对象) | local | 指定了属性对BeanFactory中其他Bean的引用关系。(仅在本地(同一个)xml文件里寻找bean |
| parent | 指定了属性对BeanFactory中其他Bean模板的引用关系 | ||
| 4.list标签 | 指定bean的属性类型为List的属性值 | ||
| 5.map标签 | 指定bean的属性类型为List的属性值 | ||
| 6.set标签 | 指定bean的属性类型为List的属性值 | ||
| 7.props标签 | 指定bean的属性类型为Properties的属性值 | ||
| 8.prop标签 | key属性:指定Properties的键 | ||
| 9.idref标签 | 用来设置属性值为容器中其他bean的id 或name | ||
| 10.null标签 | 指定一个空值。 | ||
| index | 设置参数的序号 | ||
| ref | 同ref | ||
| 11.constructor-arg标签 | type | 参数类型 | |
| value | 参数的值 | ||
| 12.lookup-method标签 | lookup方法注入 | bean | 要注入的bean名 |
| name | 要注入的方法名称 | ||
| 13.replaced-method标签 | 用来把已存在的方法实现替换为其他的实现 | name | 要替换的方法名 |
| replacer | 替换者类, 实现org.springframework.beans.factory.support.MethodReplacer<br/>接口) |
3.7 Bean的作用域
在Spring中,那些组成应用程序的主体及由Spring IoC容器所管理的对象,被称之为bean。简单地讲,bean就是由IoC容器初始化、装配及管理的对象 .
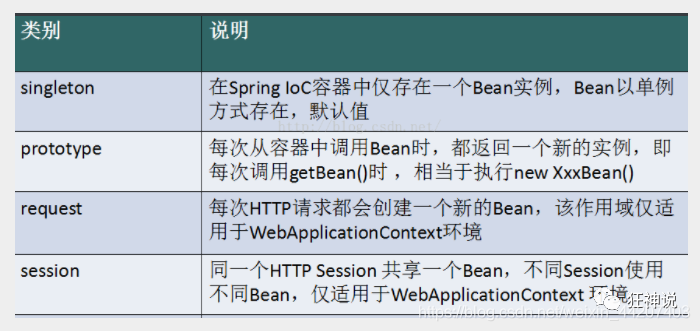
几种作用域中,request、session作用域仅在基于web的应用中使用(不必关心你所采用的是什么web应用框架),只能用在基于web的Spring ApplicationContext环境。
Singleton(单例模式)
当一个bean的作用域为Singleton,那么Spring IoC容器中只会存在一个共享的bean实例,并且所有对bean的请求,只要id与该bean定义相匹配,则只会返回bean的同一实例。Singleton是单例类型,就是在创建起容器时就同时自动创建了一个bean的对象,不管你是否使用,他都存在了,每次获取到的对象都是同一个对象。注意,Singleton作用域是Spring中的缺省作用域。要在XML中将bean定义成singleton,可以这样配置:
<bean id="ServiceImpl" class="cn.csdn.service.ServiceImpl" scope="singleton">Prototype(原型模式)
当一个bean的作用域为Prototype,表示一个bean定义对应多个对象实例。Prototype作用域的bean会导致在每次对该bean请求(将其注入到另一个bean中,或者以程序的方式调用容器的getBean()方法)时都会创建一个新的bean实例。Prototype是原型类型,它在我们创建容器的时候并没有实例化,而是当我们获取bean的时候才会去创建一个对象,而且我们每次获取到的对象都不是同一个对象。根据经验,对有状态的bean应该使用prototype作用域,而对无状态的bean则应该使用singleton作用域。在XML中将bean定义成prototype,可以这样配置:
<bean id="account" class="com.foo.DefaultAccount" scope="prototype"/>
或者
<bean id="account" class="com.foo.DefaultAccount" singleton="false"/>Request
当一个bean的作用域为Request,表示在一次HTTP请求中,一个bean定义对应一个实例;即每个HTTP请求都会有各自的bean实例,它们依据某个bean定义创建而成。该作用域仅在基于web的Spring ApplicationContext情形下有效。考虑下面bean定义:
<bean id="loginAction" class=cn.csdn.LoginAction" scope="request"/>针对每次HTTP请求,Spring容器会根据loginAction bean的定义创建一个全新的LoginAction bean实例,且该loginAction bean实例仅在当前HTTP request内有效,因此可以根据需要放心的更改所建实例的内部状态,而其他请求中根据loginAction bean定义创建的实例,将不会看到这些特定于某个请求的状态变化。当处理请求结束,request作用域的bean实例将被销毁。
Session
当一个bean的作用域为Session,表示在一个HTTP Session中,一个bean定义对应一个实例。该作用域仅在基于web的Spring ApplicationContext情形下有效。考虑下面bean定义:
<bean id="userPreferences" class="com.foo.UserPreferences" scope="session"/>针对某个HTTP Session,Spring容器会根据userPreferences bean定义创建一个全新的userPreferences bean实例,且该userPreferences bean仅在当前HTTP Session内有效。与request作用域一样,可以根据需要放心的更改所创建实例的内部状态,而别的HTTP Session中根据userPreferences创建的实例,将不会看到这些特定于某个HTTP Session的状态变化。当HTTP Session最终被废弃的时候,在该HTTP Session作用域内的bean也会被废弃掉。
4.注解开发
1.注解开发
为了简化配置,Spring支持使用注解代替xml配置。
2.Spring常用注解
2.0 注解开发准备工作
如果要使用注解开发必须要开启组件扫描,这样加了注解的类才会被识别出来。Spring才能去解析其中的注解。
<!--启动组件扫描,指定对应扫描的包路径,该包及其子包下所有的类都会被扫描,加载包含指定注解的类-->
<context:component-scan base-package="com.sangeng"/>2.1 IOC相关注解
2.1.1 @Component(构件),@Controller,@Service ,@Repository(仓库)
上述4个注解都是加到类上的。
他们都可以起到类似bean标签的作用。可以把加了该注解类的对象放入Spring容器中。
实际再使用时选择任意一个都可以。但是后3个注解是语义化注解。
如果是Service类要求使用@Service。
如果是Dao类要求使用@Repository
如果是Controllerl类(SpringMVC中会学习到)要求使用@Controller
如果是其他类可以使用@Component
2.2 DI相关注解
如果一个bean已经放入Spring容器中了。那么我们可以使用下列注解实现属性注入,让Spring容器帮我们完成属性的赋值。
2.2.1 @Value
主要用于String,Integer等可以直接赋值的属性注入。不依赖setter方法,支持SpEL表达式
1、可以不用提供set方法,直接在直接名上添加@value(“值”)
@Component("user")
// 相当于配置文件中 <bean id="user" class="当前注解的类"/>
public class User {
@Value("秦疆")
// 相当于配置文件中 <property name="name" value="秦疆"/>
public String name;
}2、如果提供了set方法,在set方法上添加@value(“值”);
@Component("user")
public class User {
public String name;
@Value("秦疆")
public void setName(String name) {
this.name = name;
}
}2.2.2 @AutoWired
Spring会给加了该注解的属性自动注入数据类型相同的对象,
- @Autowired是按类型自动转配的,不支持id匹配。
- 需要导入 spring-aop的包,由于Maven包依赖的问题,传入spring-context会自动传入spring-aop
@Autowired(required=false) 说明:false,对象可以为null;true,对象必须存对象,不能为null。
required属性代表这个属性是否是必须的,默认值为true。如果是true的话Spring容器中如果找不到相同类型的对象完成属性注入就会出现异常。
eg.
@Service("userService")
@Data
@NoArgsConstructor
@AllArgsConstructor
public class UserServiceImpl implements UserService {
@Autowired
private UserDao userDao;
@Value("199")
private int num;
@Value("三更草堂")
private String str;
@Value("#{19+3}")
private Integer age;
public void show() {
userDao.show();
}
}2.2.3 @Qualifier(资格对象)
如果相同类型的bean在容器中有多个时,单独使用@AutoWired就不能满足要求,这时候可以再加上@Qualifier来指定bean的名字从容器中获取bean注入。
- @Autowired是根据类型自动装配的,加上@Qualifier则可以根据byName的方式自动装配
- @Qualifier不能单独使用
2.2.4 @Resource
- @Resource如有指定的name属性,先按该属性进行byName方式查找装配;
- 其次再进行默认的byName方式进行装配;
- 如果以上都不成功,则按byType的方式自动装配。
- 都不成功,则报异常。
小结
2.2.5 @Autowired与@Resource异同:
1、@Autowired与@Resource都可以用来装配bean。都可以写在字段上,或写在setter方法上。
2、@Autowired默认按类型装配(属于spring规范),默认情况下必须要求依赖对象必须存在,如果要允许null 值,可以设置它的required属性为false,如:@Autowired(required=false) ,如果我们想使用名称装配可以结合@Qualifier注解进行使用
3、@Resource(属于J2EE复返),默认按照名称进行装配,名称可以通过name属性进行指定。如果没有指定name属性,当注解写在字段上时,默认取字段名进行按照名称查找,如果注解写在setter方法上默认取属性名进行装配。当找不到与名称匹配的bean时才按照类型进行装配。但是需要注意的是,如果name属性一旦指定,就只会按照名称进行装配。
它们的作用相同都是用注解方式注入对象,但执行顺序不同。@Autowired先byType,@Resource先byName。
2.3 xml配置文件相关注解(基于Java类进行配置)
之前在java/resources文件放置applicationContext.xml,在使用时创建ClassPathXmlApplicationContext对象容器来映射bean
现在在java下创建文件夹Config,再创建一个ApplicationConfig 配置类来替换xml配置。这样就要使用注解来映射配置
2.3.1 @Configuration(构件类)
标注在类上,表示当前类是一个配置类。我们可以用注解类来完全替换掉xml配置文件。
注意:如果使用配置类替换了xml配置,spring容器要使用:AnnotationConfigApplicationContext
eg.
@Configuration
public class ApplicationConfig {
}2.3.2 @ComponentScan(构件扫描)
可以用来代替context:component-scan标签来配置组件扫描。
basePackages属性来指定要扫描的包。
注意要加在配置类上。
eg.
@Configuration
@ComponentScan(basePackages = "com.sangeng")//指定要扫描的包
public class ApplicationConfig {
}2.3.3 @Bean(通过方法注入)
可以用来代替bean标签,主要用于第三方类的注入,返回值就Bean的类型,方法名就是bean的id.
使用:定义一个方法,在方法中创建对应的对象并且作为返回值返回。然后在方法上加上@Bean注解,注解的value属性来设置bean的名称。
eg.
@Configuration
@ComponentScan(basePackages = "com.sangeng")
public class ApplicationConfig {
@Bean("dataSource")
public DruidDataSource getDataSource(){
DruidDataSource druidDataSource = new DruidDataSource();
druidDataSource.setDriverClassName("com.mysql.jdbc.Driver");
druidDataSource.setUsername("root");
druidDataSource.setUrl("jdbc:mysql://localhost:3306/mybatis_db");
druidDataSource.setPassword("root");
return druidDataSource;
}
}注意事项:如果同一种类型的对象在容器中只有一个,我们可以不设置bean的名称。
获取方式如下:
public static void main(String[] args) {
//创建注解容器
AnnotationConfigApplicationContext app = new AnnotationConfigApplicationContext(ApplicationConfig.class);
//根据对应类的字节码对象获取
DataSource bean = app.getBean(DataSource.class);
System.out.println(userService);
}2.3.4 @PropertySource(所有物资源)
可以用来代替context:property-placeholder,让Spring读取指定的properties文件。然后可以使用@Value来获取读取到的值。
使用:在配置类上加@PropertySource注解,注解的value属性来设置properties文件的路径。
然后在配置类中定义成员变量。在成员变量上使用@Value注解来获取读到的值并给对应的成员变量赋值。
eg.(jdbc.properties)
jdbc.driver=com.mysql.jdbc.Driver
jdbc.url=jdbc:mysql://localhost:3306/mybatis_db
jdbc.username=root
jdbc.password=root读取文件并且获取值
@Configuration
@ComponentScan(basePackages = "com.sangeng")
@PropertySource("jdbc.properties")
public class ApplicationConfig {
@Value("${jdbc.driver}")
private String driverClassName;
@Value("${jdbc.url}")
private String url;
@Value("${jdbc.username}")
private String username;
@Value("${jdbc.password}")
private String password;
@Bean
public DruidDataSource getDataSource(){
DruidDataSource druidDataSource = new DruidDataSource();
druidDataSource.setDriverClassName(driverClassName);
druidDataSource.setUsername(username);
druidDataSource.setUrl(url);
druidDataSource.setPassword(password);
return druidDataSource;
}
}注意事项:使用@Value获取读到的properties文件中的值时使用的是${key},而不是#{key}。
2.3.5 @Import
导入合并其他配置类,类似于配置文件中的 inculde 标签
eg.
配置类1
@Configuration //代表这是一个配置类
public class MyConfig1 {
}配置类2
@Configuration //代表这是一个配置类
@Import(MyConfig1.class) //导入合并其他配置类,类似于配置文件中的 inculde 标签
public class MyConfig2 {
@Bean
public Dog dog(){
return new Dog();
}
}3.如何选择
①SSM
自己项目中的类的IOC和DI都使用注解,对第三方jar包中的类,配置组件扫描时使用xml进行配置。
②SpringBoot
纯注解开发
5.AOP(代理模式中的动态代理)
5.1 代理模式(未完成)
- 静态代理
- 动态代理
详细(未完成)
总结:
公共事务由代理完成(日志相关等),实现了业务的分工
程序员不用关注公共事务,完成核心业务即可
公共业务发生扩展时变得更加集中和方便
5.2 AOP
AOP(Aspect Oriented Programming)意为:面向切面编程,通过预编译方式和运行期动态代理实现程序功能的统一维护的一种技术。AOP是OOP的延续,是软件开发中的一个热点,也是Spring框架中的一个重要内容,是函数式编程的一种衍生范型。利用AOP可以对业务逻辑的各个部分进行隔离,从而使得业务逻辑各部分之间的耦合度降低,提高程序的可重用性,同时提高了开发的效率。
SpringAOP: 批量对Spring容器中bean的方法做增强,并且这种增强不会与原来方法中的代码耦合。
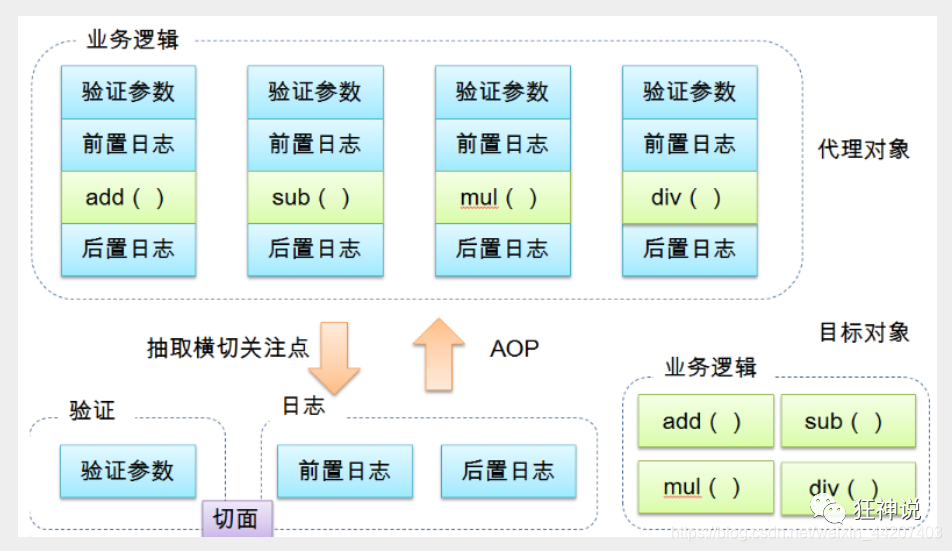
5.3 Aop在Spring中的作用
提供声明式事务;允许用户自定义切面
以下名词需要了解下:
- 横切关注点:跨越应用程序多个模块的方法或功能。即是,与我们业务逻辑无关的,但是我们需要关注的部分,就是横切关注点。如日志 , 安全 , 缓存 , 事务等等 …
- 切面(ASPECT):横切关注点被模块化的特殊对象。即,它是一个类。是切入点和通知(引介)的结合
- 通知(Advice):切面必须要完成的工作。即,它是类中的一个方法。所谓通知是指具体增强的代码
- 目标(Target):被增强的通知对象。
- 代理(Proxy):向目标对象应用通知之后创建的对象。一个类被 AOP 增强后,就产生一个结果代理类
- 切入点(PointCut):切面通知执行的 “地点”的定义。所谓切入点是指被增强的连接点(方法)
- 连接点(JointPoint):与切入点匹配的执行点。所谓连接点是指那些可以被增强到的点。在spring中,所有方法都是连接点,因为spring只支持方法类型的连接点
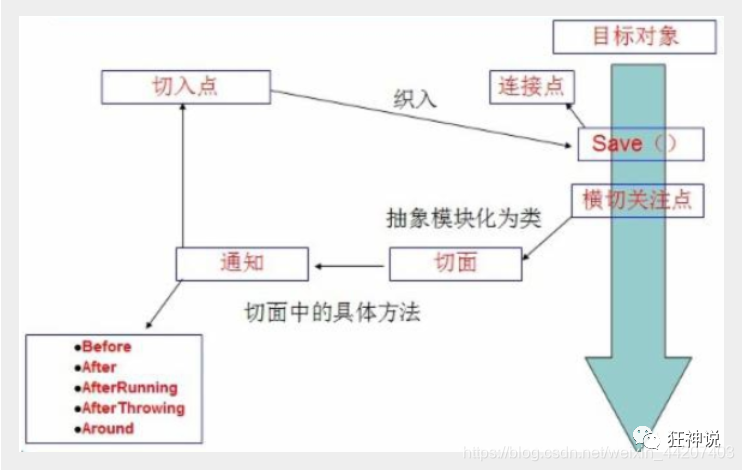
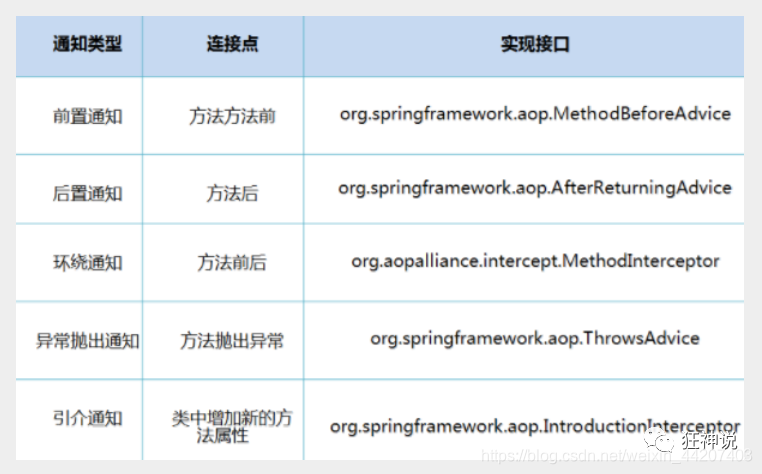
SpringAOP中,通过Advice定义横切逻辑,Spring中支持5种类型的Advice:
即 Aop 在 不改变原有代码的情况下 , 去增加新的功能
5.4 快速入门案例(创建配置类的案例)
注意:同ioc和di有创建配置类开发和xml配置文件映射开发,最后再用注解映射。aop也有这两种开发,实际上在springBoot中注解开发更常见,所以重视注解开发
5.4.1准备工作(注解开发)
①添加依赖:需要添加SpringIOC相关依赖和AOP相关依赖
<!--SpringIOC相关依赖-->
<dependency>
<groupId>org.springframework</groupId>
<artifactId>spring-context</artifactId>
<version>5.1.9.RELEASE</version>
</dependency>
<!--AOP相关依赖-->
<dependency>
<groupId>org.aspectj</groupId>
<artifactId>aspectjweaver</artifactId>
<version>1.8.13</version>
</dependency>②相关bean要注入容器中
开启组件扫描:
<context:component-scan base-package="com.sangeng"></context:component-scan>加@Service注解
@Service
public class PhoneService {
public void deleteAll(){
System.out.println("PhoneService中deleteAll的核心代码");
}
}@Service
public class UserService {
public void deleteAll(){
System.out.println("UserService中deleteAll的核心代码");
}
}5.4.2实现AOP
①开启AOP注解支持
使用aop:aspectj-autoproxy标签
<?xml version="1.0" encoding="UTF-8"?>
<beans xmlns="http://www.springframework.org/schema/beans"
xmlns:xsi="http://www.w3.org/2001/XMLSchema-instance" xmlns:aop="http://www.springframework.org/schema/aop"
xmlns:context="http://www.springframework.org/schema/context"
xsi:schemaLocation="http://www.springframework.org/schema/beans http://www.springframework.org/schema/beans/spring-beans.xsd http://www.springframework.org/schema/aop https://www.springframework.org/schema/aop/spring-aop.xsd http://www.springframework.org/schema/context https://www.springframework.org/schema/context/spring-context.xsd">
<!--开启组件扫描-->
<context:component-scan base-package="com.sangeng"></context:component-scan>
<!--开启aop注解支持-->
<aop:aspectj-autoproxy></aop:aspectj-autoproxy>
</beans>②创建切面类
创建一个类,在类上加上@Component和@Aspect
方式一:
使用@Pointcut注解来指定要被增强的方法
使用@Before注解来给我们的增强代码所在的方法进行标识,并且指定了增强代码是在被增强方法执行之前执行的。
方式二:
使用@Before注解,后面指定被增强的路径
@Component
@Aspect
public class MyAspect {
//方式一:
// 用Pointcut注解中的属性来指定对哪些方法进行增强
@Pointcut("execution(* com.sangeng.service.*.*(..))")
public void pt(){}
/*
用@Before注解来指定该方法中是增强的代码,并且是在被增强方法执行前执行的
@Before的属性写上加了@Pointcut注解的方法: 方法名()
*/
@Before("pt()")
public void methodbefore(){
System.out.println("方法被调用了");
}
//方式二:
//
@Before("execution(* com.sangeng.service.*.*(..))")
public void methodbefore(){
System.out.println("方法被调用了");
}
}5.4.3 测试
public static void main(String[] args) { ApplicationContext applicationContext = new ClassPathXmlApplicationContext("applicationContext.xml");
PhoneService phoneService = applicationContext.getBean(PhoneService.class);
UserService userService = applicationContext.getBean(UserService.class);
phoneService.deleteAll();
}
//结果
/*
方法被调用了
PhoneService中deleteAll的核心代码
UserService中deleteAll的核心代码
*/Spring的Aop就是将公共的业务 (日志 , 安全等) 和领域业务结合起来 , 当执行领域业务时 , 将会把公共业务加进来 . 实现公共业务的重复利用 . 领域业务更纯粹 , 程序猿专注领域业务 , 其本质还是动态代理 .
5.5 切点确定
5.5.1 切点表达式
可以使用切点表达式来表示要对哪些方法进行增强。
写法:execution([修饰符] 返回值类型 包名.类名.方法名(参数))
- 访问修饰符可以省略,大部分情况下省略
- 返回值类型、包名、类名、方法名可以使用星号* 代表任意
- 包名与类名之间一个点 . 代表当前包下的类,两个点 … 表示当前包及其子包下的类
- 参数列表可以使用两个点 … 表示任意个数,任意类型的参数列表
eg.
execution(* com.sangeng.service.*.*(..)) 表示com.sangeng.service包下任意类,方法名任意,参数列表任意,返回值类型任意
execution(* com.sangeng.service..*.*(..)) 表示com.sangeng.service包及其子包下任意类,方法名任意,参数列表任意,返回值类型任意
execution(* com.sangeng.service.*.*()) 表示com.sangeng.service包下任意类,方法名任意,要求方法不能有参数,返回值类型任意
execution(* com.sangeng.service.*.delete*(..)) 表示com.sangeng.service包下任意类,要求方法不能有参数,返回值类型任意,方法名要求已delete开头
从下面开始学习切入点
5.5.2 切点函数@annotation(更优秀)
我们也可以在要增强的方法上加上注解。然后使用@annotation来表示对加了什么注解的方法进行增强。
写法:@annotation(注解的全类名)
1.先创建一个自定义注解
@Target({ElementType.METHOD})//该注解可以加在方法上
@Retention(RetentionPolicy.RUNTIME)//在运行时加载
2.给需要增强的方法增加注解
3.切面类中使用@annotation来确定要增强的方法
eg.
1.先创建一个自定义注解
@Target({ElementType.METHOD})//该注解可以加在方法上
@Retention(RetentionPolicy.RUNTIME)
public @interface InvokeLog {
}2.给需要增强的方法增加注解
@Service
public class PhoneService {
@InvokeLog
public void deleteAll(){
System.out.println("PhoneService中deleteAll的核心代码");
}
}3.切面类中使用@annotation来确定要增强的方法
@Component
@Aspect
public class MyAspect {
// 用Pointcut注解中的属性来指定对哪些方法进行增强
@Pointcut("@annotation(com.sangeng.aspect.InvokeLog)")
public void pt(){}
/*
用@Before注解来指定该方法中是增强的代码,并且是在被增强方法执行前执行的
@Before的属性写上加了@Pointcut注解的方法: 方法名()
*/
@Before("pt()")
public void methodbefore(){
System.out.println("方法被调用了");
}
}5.6 通知advice分类
- @Before:前置通知,在目标方法执行前执行
- @AfterReturning: 返回后通知,在目标方法执行后执行,如果出现异常不会执行
- @After:后置通知,在目标方法之后执行,无论是否出现异常都会执行
- @AfterThrowing:异常通知,在目标方法抛出异常后执行
- @Around:环绕通知,围绕着目标方法执行(前4个的集大成注解)
理解不同通知执行时机。(下面的伪代码是用来理解单个通知的执行时机的,不能用来理解多个通知情况下的执行顺序。如果需要配置多个通知我们会选择使用Around通知,更加的清晰并且好用)
public Object test() {
before();//@Before 前置通知
try {
Object ret = 目标方法();//目标方法调用
afterReturing();//@AfterReturning 返回后通知
} catch (Throwable throwable) {
throwable.printStackTrace();
afterThrowing();//@AfterThrowing 异常通知通知
}finally {
after();//@After 后置通知
}
return ret;
}环绕通知非常特殊,它可以对目标方法进行全方位的增强。
eg.
@Around("pt()")
public void around(ProceedingJoinPoint pjp){
System.out.println("目标方法前");
try {
pjp.proceed();//目标方法执行
System.out.println("目标方法后");
} catch (Throwable throwable) {
throwable.printStackTrace();
System.out.println("目标方法出现异常");
}finally {
System.out.println("finally中进行增强");
}
}注意:
在使用around注解时,增强方法需要添加ProceedingJoinPoint数据类型参数,同时调用目标方法pjp.proceed()方法,该方法要执行异常
5.7 获取被增强方法相关
我们实际对方法进行增强时往往还需要获取到被增强代码的相关信息,比如方法名,参数,返回值,异常对象等。
我们可以在除了环绕通知外的所有通知方法中增加一个JoinPoint类型的参数。这个参数封装了被增强方法的相关信息。我们可以通过这个参数获取到除了异常对象和返回值之外的所有信息。
5.7.1 JoinPoint
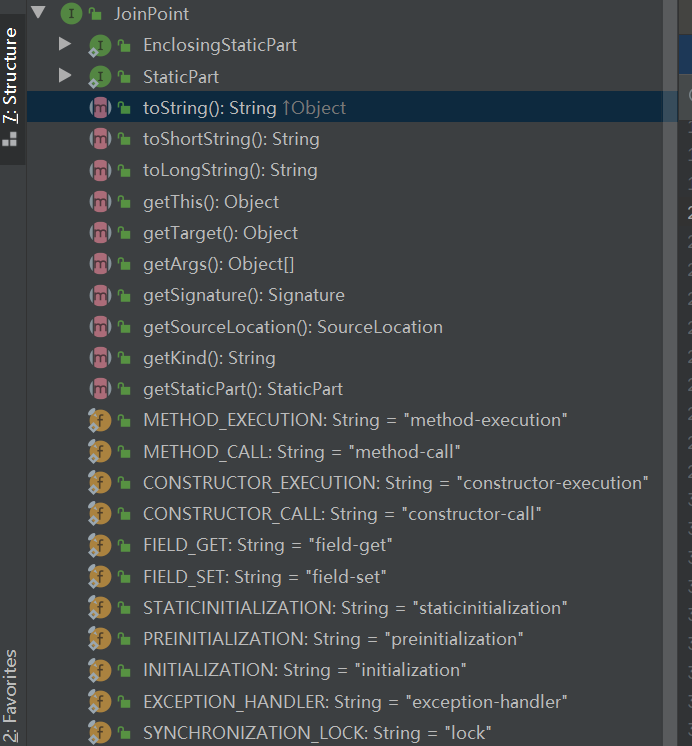
| 方法名 | 功能 |
|---|---|
| Signature getSignature(); | 获取封装了署名信息的对象,在该对象中可以获取到目标方法名,所属类的Class等信息 |
| Object[] getArgs(); | 获取传入目标方法的参数对象 |
| Object getTarget(); | 获取被代理的对象 |
| Object getThis(); | 获取代理对象 |
5.7.2 Signature常用方法
package org.aspectj.lang;
public interface Signature {
String toString();/字符输出
String toShortString();//短字符输出
String toLongString();//长字符输出
String getName();//方法名
int getModifiers();//返回修饰符的整型标识
Class getDeclaringType();//返回类名类型
String getDeclaringTypeName();////返回类名
}
eg.
@Before("pt()")
public void methodbefore(JoinPoint jp){
Object[] args = jp.getArgs();//方法调用时传入的参数
Object target = jp.getTarget();//被代理对象
MethodSignature signature = (MethodSignature) jp.getSignature();//获取被被增强方法签名封装的对象
System.out.println("Before方法被调用了");
}eg.需求:要求让所有service包下类的所有方法被调用前都输出全类名,方法名,以及调用时传入的参数
@Component
@Aspect
public class PrintLogAspect {
//对哪些方法增强
@Pointcut("execution(* com.sangeng.service..*.*(..))")
public void pt(){}
//怎么增强
@Before("pt()")
public void printLog(JoinPoint joinPoint){
//输出 被增强的方法所在的类名 方法名 调用时传入的参数 joinPoint.getSignature().getName() joinPoint.getArgs()
MethodSignature signature = (MethodSignature) joinPoint.getSignature();
//类名
String className = signature.getDeclaringTypeName();
//方法名
String methodName = signature.getName();
//调用时传入的参数
Object[] args = joinPoint.getArgs();
System.out.println(className+"=="+methodName+"======"+ Arrays.toString(args));
}
}
5.7.3 获取被增强方法中的异常对象或者返回值
如果需要获取被增强方法中的异常对象或者返回值则需要在方法参数上增加一个对应类型的参数,并且使用注解的属性进行配置。这样Spring会把你想获取的数据赋值给对应的方法参数。
针对@AfterReturning和@AfterThrowing这两种类型
eg.
@AfterReturning(value = "pt()",returning = "ret")//使用returning属性指定了把目标方法返回值赋值给下面方法的参数ret
public void AfterReturning(JoinPoint jp,Object ret){
System.out.println("AfterReturning方法被调用了");
}@AfterThrowing(value = "pt()",throwing = "t")//使用throwing属性指定了把出现的异常对象赋值给下面方法的参数t
public void AfterThrowing(JoinPoint jp,Throwable t){
System.out.println("AfterReturning方法被调用了");
}5.7.4 ProceedingJoinPoint
ProceedingJoinPoint是JoinPoint的子接口,该对象只在@Around的切面方法中
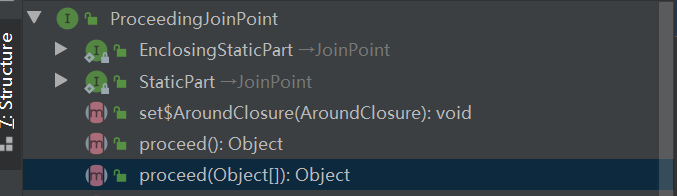
常用方法
- Object proceed() throws Throwable; 执行目标方法
- Object proceed(Object[] var1) throws Throwable; 传入的新的参数去执行目标方法
eg.
直接在环绕通知方法中增加一个ProceedingJoinPoint类型的参数。这个参数封装了被增强方法的相关信息。
该参数的proceed()方法被调用相当于被增强方法被执行,调用后的返回值就相当于被增强方法的返回值。
@Around(value = "pt()")
public Object around(ProceedingJoinPoint pjp) {
Object[] args = pjp.getArgs();//方法调用时传入的参数
Object target = pjp.getTarget();//被代理对象
MethodSignature signature = (MethodSignature) pjp.getSignature();//获取被被增强方法签名封装的对象
Object ret = null;
try {
ret = pjp.proceed();//ret就是目标方法执行后的返回值
} catch (Throwable throwable) {
throwable.printStackTrace();//throwable就是出现异常时的异常对象
}
return ret;
}
5.8 xml配置AOP
XML的实例就是把前面用Annotation注解的方式转到配置文件中,案例代码不变并且只给出一个案例,不全部还原
5.8.1 标签详解
| 标签 | 属性 | 描述 |
|---|---|---|
| aop:aspectj-autoproxy | 无 | 注解式自动代理 |
| expose-proxy="true/false" | ||
| aop:config | proxy-target-class="true/false" |
<!-- 1. expose-proxy。为是否暴露当前代理对象为ThreadLocal模式,默认为false -->
<!-- 2. proxy-target-class决定代理的创建方式,默认为false即jkd代理, -->
<aop:config expose-proxy="true/false" proxy-target-class="true/false">
<!--定义切点 id为切点名称,expression为切点表达式,annotation为注释类-->
<aop:pointcut id="pt1" expression="execution(* com.sangeng.service..*.*(..))"></aop:pointcut>
<aop:pointcut id="pt2" expression="@annotation(com.sangeng.aspect.InvokeLog)"></aop:pointcut>
<!--配置切面 id为String类型的名称,ref为切面对象的名称,order为aop执行顺序-->
<aop:aspect id="" ref="myAspect" order="" >
<!--aspect有5种- @Before, @AfterReturning,@After,@AfterThrowing,@Around通知类型,
declare-parents同时为特定的类增加新的功能-->
<!-- declare-parents中 types-matching为匹配类型,implement-interface为接口名称 -->
<aop:declare-parents types-matching="" implement-interface=""></aop:declare-parents>
<!--method为执行5种通知的方法名称。 pointcut-ref为切点的id名称,对应执行切点的路径 -->
<aop:before method="before" pointcut-ref="pt1"></aop:before>
<aop:after method="after" pointcut-ref="pt1"></aop:after>
<!-- after-returning有返回值returning -->
<aop:after-returning method="afterReturning" pointcut-ref="pt1" returning="ret"></aop:after-returning>
<!-- after-throwing有throwing抛出异常的参数 -->
<aop:after-throwing method="afterThrowing" pointcut-ref="pt2" throwing="e"></aop:after-throwing>
</aop:aspect>
</aop:config>5.8.2 区别:
aop:advisor和aop:aspect的区别:
aop:aspect实际上是定义横切逻辑,就是在连接点上做什么,可以多个pointcut和多个advice
aop:advisor则定义了在哪些连接点上应用什么,特殊的Aspect,Advisor代表spring中的Aspect,只持有一个Pointcut和一个advice
<aop:advisor advice-ref="" order="" id="" pointcut="" pointcut-ref=""></aop:advisor>
<aop:aspect id="" ref="" order="">
...
</aop:aspect>5.8.3 eg.xml配置AOP
①定义切面类
public class MyAspect {
public void before(JoinPoint joinPoint){
System.out.println("before");
}
// @AfterReturning(value = "pt()",returning = "ret")
public void afterReturning(JoinPoint joinPoint,Object ret){
System.out.println("afterReturning:"+ret);
}
// @After("pt()")
public void after(JoinPoint joinPoint){
System.out.println("after");
}
// @AfterThrowing(value = "pt()",throwing = "e")
public void afterThrowing(JoinPoint joinPoint,Throwable e){
String message = e.getMessage();
System.out.println("afterThrowing:"+message);
}
public Object around(ProceedingJoinPoint pjp){
//获取参数
Object[] args = pjp.getArgs();
MethodSignature signature = (MethodSignature) pjp.getSignature();
Object target = pjp.getTarget();
Object ret = null;
try {
ret = pjp.proceed();//目标方法的执行
//ret就是被增强方法的返回值
System.out.println(ret);
} catch (Throwable throwable) {
throwable.printStackTrace();
System.out.println(throwable.getMessage());
}
// System.out.println(pjp);
return ret;
}
}②目标类和切面类注入容器
在切面类和目标类上加是对应的注解。注入如果是使用注解的方式注入容器要记得开启组件扫描。
当然你也可以在xml中使用bean标签的方式注入容器。
@Component//把切面类注入容器
public class MyAspect {
//..。省略无关代码
}@Service//把目标类注入容器
public class UserService {
//..。省略无关代码
}③配置AOP
<?xml version="1.0" encoding="UTF-8"?>
<beans xmlns="http://www.springframework.org/schema/beans"
xmlns:xsi="http://www.w3.org/2001/XMLSchema-instance"
xmlns:context="http://www.springframework.org/schema/context"
xmlns:aop="http://www.springframework.org/schema/aop"
xsi:schemaLocation="http://www.springframework.org/schema/beans http://www.springframework.org/schema/beans/spring-beans.xsd http://www.springframework.org/schema/context https://www.springframework.org/schema/context/spring-context.xsd http://www.springframework.org/schema/aop https://www.springframework.org/schema/aop/spring-aop.xsd">
<!--开启组件扫描-->
<context:component-scan base-package="com.sangeng"></context:component-scan>
<!--配置AOP-->
<aop:config>
<!--定义切点-->
<aop:pointcut id="pt1" expression="execution(* com.sangeng.service..*.*(..))"></aop:pointcut>
<aop:pointcut id="pt2" expression="@annotation(com.sangeng.aspect.InvokeLog)"></aop:pointcut>
<!--配置切面-->
<aop:aspect ref="myAspect">
<aop:before method="before" pointcut-ref="pt1"></aop:before>
<aop:after method="after" pointcut-ref="pt1"></aop:after>
<aop:after-returning method="afterReturning" pointcut-ref="pt1" returning="ret"></aop:after-returning>
<aop:after-throwing method="afterThrowing" pointcut-ref="pt2" throwing="e"></aop:after-throwing>
</aop:aspect>
</aop:config>
</beans>
5.9 多切面顺序问题
在实际项目中我们可能会存在配置了多个切面的情况。这种情况下我们很可能需要控制切面的顺序。
我们在默认情况下Spring有它自己的排序规则。(按照类名排序)
默认排序规则往往不符合我们的要求,我们需要进行特殊控制。
如果是注解方式配置的AOP可以在切面类上加**@Order注解来控制顺序。@Order中的属性越小优先级越高。**
如果是XML方式配置的AOP,可以通过调整配置顺序来控制。
5.10 AOP原理-动态代理
实际上Spring的AOP其实底层就是使用动态代理来完成的。并且使用了两种动态代理分别是JDK的动态代理和Cglib动态代理。
所以我们接下去来学习下这两种动态代理,理解下它们的不同点。
5.10.1 JDK动态代理
JDK的动态代理使用的java.lang.reflect.Proxy这个类来进行实现的。要求被代理(被增强)的类需要实现了接口。并且JDK动态代理也只能对接口中的方法进行增强。
public static void main(String[] args) {
AIControllerImpl aiController = new AIControllerImpl();
//使用动态代理增强getAnswer方法
//1.JDK动态代理
//获取类加载器
ClassLoader cl = Demo.class.getClassLoader();
//被代理类所实现接口的字节码对象数组
Class<?>[] interfaces = AIControllerImpl.class.getInterfaces();
AIController proxy = (AIController) Proxy.newProxyInstance(cl, interfaces, new InvocationHandler() {
//使用代理对象的方法时 会调用到invoke
public Object invoke(Object proxy, Method method, Object[] args) throws Throwable {
//proxy 是代理对象
//method 是当前被调用的方法封装的Method对象
//args 是调用方法时传入的参数
//调用被代理对象的对应方法
//判断 当前调用的是否是getAnswer方法
if(method.getName().equals("getAnswer")){
System.out.println("增强");
}
Object ret = method.invoke(aiController, args);
return ret;
}
});
String answer = proxy.getAnswer("三连了吗?");
System.out.println(answer);
}
5.10.2 Cglib动态代理
使用的是org.springframework.cglib.proxy.Enhancer类进行实现的
public class CglibDemo {
public static void main(String[] args) {
Enhancer enhancer = new Enhancer();
//设置父类的字节码对象
enhancer.setSuperclass(AIControllerImpl.class);
enhancer.setCallback(new MethodInterceptor() {
//使用代理对象执行方法是都会调用到intercept方法
@Override
public Object intercept(Object o, Method method, Object[] objects, MethodProxy methodProxy) throws Throwable {
//判断当前调用的方法是不是getAnswer方法 如果是进行增强
if ("getAnswer".equals(method.getName())){
System.out.println("被增强了");
}
//调用父类中对应的方法
Object ret = methodProxy.invokeSuper(o, objects);
return ret;
}
});
//生成代理对象
AIControllerImpl proxy = (AIControllerImpl) enhancer.create();
// System.out.println(proxy.getAnswer("你好吗?"));
System.out.println(proxy.fortuneTelling("你好吗?"));
}
}5.10.3 总结
JDK动态代理要求被代理(被增强)的类必须要实现接口,生成的代理对象相当于是被代理对象的兄弟。
Cglib的动态代理不要求被代理(被增强)的类要实现接口,生成的代理对象相当于被代理对象的子类对象。
Spring的AOP默认情况下优先使用的是JDK的动态代理,如果使用不了JDK的动态代理才会使用Cglib的动态代理。
5.11 切换默认动态代理方式
有的时候我们需要修改AOP的代理方式。
我们可以使用以下方式修改:
如果我们是采用注解方式配置AOP的话:
设置aop:aspectj-autoproxy标签的proxy-target-class属性为true,代理方式就会修改成Cglib
<aop:aspectj-autoproxy proxy-target-class="true"/><!--默认false为jdk代理-->如果我们是采用xml方式配置AOP的话:
设置aop:config标签的proxy-target-class属性为true,代理方式就会修改成Cgli
<aop:config proxy-target-class="true">
</aop:config>6. Spring整合Junit
不用Spring整合Junit的话,在测试时需要自己创建对象并注入
但是使用Junit整合,可以用注解DI对象
使用步骤:
①在pom.xml下导入Junit和spring-test依赖
②在测试类上注入@RunWith(SpringJUnit4ClassRunner.class)和映射spring的xml文件
③注入对象进行测试
①导入依赖
<!-- junit -->
<dependency>
<groupId>junit</groupId>
<artifactId>junit</artifactId>
<version>4.12</version>
</dependency>
<!-- spring整合junit的依赖 -->
<dependency>
<groupId>org.springframework</groupId>
<artifactId>spring-test</artifactId>
<version>5.1.9.RELEASE</version>
</dependency>
② 编写测试类
在测试类上加上
**@RunWith(SpringJUnit4ClassRunner.class)**注解,指定让测试运行于Spring环境(整合注解)
@ContextConfiguration注解,指定Spring容器创建需要的配置文件或者配置类(映射注解)
@RunWith(SpringJUnit4ClassRunner.class)//让测试运行与Spring测试环境
@ContextConfiguration(locations = "classpath:配置文件1.xml")//设置Spring配置文件或者配置类
//@ContextConfiguration(classes = SpringConfig.class)
public class SpringTest {}
③注入对象进行测试
在测试类中注入要测试的对象,定义测试方法,在其中使用要测试的对象。
@RunWith(SpringJUnit4ClassRunner.class)//让测试运行与Spring测试环境
@ContextConfiguration(locations = "classpath:配置文件1.xml")//设置Spring配置文件或者配置类
//@ContextConfiguration(classes = SpringConfig.class)
public class SpringTest {
// 想测哪个对象,就注入哪个对象
@Autowired
private UserService userService;
//定义测试方法
@Test
public void testUserService() {
userService.findById(10);
}
}
7.Spring整合Mybatis
我们如果想把Mybatis整合到Spring中需要使用一个整合包mybatis-spring
官方文档:http://mybatis.org/spring/zh/index.html
正常情况下,我们使用Mybatis使用本地或第三方的数据库时,需要创建一个utils包,里面封装的Sqlsession的方法,来测试
但是这样也不够方便,所以可以利用Spring中bean封装的特点,把Mybatis中的SqlSessionFactory对象来注入,同时扫描其mapper对象,达到spring和Mybatis整合的目的
①导入依赖
<!-- spring-jdbc -->
<dependency>
<groupId>org.springframework</groupId>
<artifactId>spring-jdbc</artifactId>
<version>5.1.9.RELEASE</version>
</dependency>
<!-- mybatis整合到Spring的整合包 -->
<dependency>
<groupId>org.mybatis</groupId>
<artifactId>mybatis-spring</artifactId>
<version>2.0.4</version>
</dependency>
<!--mybatis依赖-->
<dependency>
<groupId>org.mybatis</groupId>
<artifactId>mybatis</artifactId>
<version>3.5.4</version>
</dependency>
<!--mysql驱动-->
<dependency>
<groupId>mysql</groupId>
<artifactId>mysql-connector-java</artifactId>
<version>5.1.47</version>
</dependency>
<!-- druid数据源 -->
<dependency>
<groupId>com.alibaba</groupId>
<artifactId>druid</artifactId>
<version>1.1.16</version>
</dependency>
②往容器中注入整合相关对象(在applicationContext.xml下)
<!--读取jdbc.properties文件-->
<context:property-placeholder location="classpath:jdbc.properties"></context:property-placeholder>
<!--创建连接池注入容器-->
<bean class="com.alibaba.druid.pool.DruidDataSource" id="dataSource">
<property name="url" value="${jdbc.url}"></property>
<property name="username" value="${jdbc.username}"></property>
<property name="password" value="${jdbc.password}"></property>
<property name="driverClassName" value="${jdbc.driver}"></property>
</bean>
<!--spring整合mybatis后控制的创建获取SqlSessionFactory的对象-->
<bean class="org.mybatis.spring.SqlSessionFactoryBean" id="sessionFactory">
<!--配置连接池-->
<property name="dataSource" ref="dataSource"></property>
<!--配置mybatis配置文件的路径-->
<property name="configLocation" value="classpath:mybatis-config.xml"></property>
</bean>
<!--mapper扫描配置,扫描到的mapper对象会被注入Spring容器中-->
<bean class="org.mybatis.spring.mapper.MapperScannerConfigurer" id="mapperScannerConfigurer">
<property name="basePackage" value="com.sangeng.dao"></property>
</bean>
③mybatis配置文件mybatis-config.xml如下:
<?xml version="1.0" encoding="UTF-8" ?>
<!DOCTYPE configuration
PUBLIC "-//mybatis.org//DTD Config 3.0//EN"
"http://mybatis.org/dtd/mybatis-3-config.dtd">
<configuration>
<settings>
<!--将表中字段的下划线自动转换为驼峰-->
<setting name="mapUnderscoreToCamelCase" value="true"/>
<!--开启延迟加载-->
<setting name="lazyLoadingEnabled" value="true"/>
</settings>
<typeAliases>
<package name="com.sangeng.domain"></package>
</typeAliases>
</configuration>④对比未整合Spring之前的Mybatis-config.xml包
<?xml version="1.0" encoding="UTF-8" ?>
<!DOCTYPE configuration
PUBLIC "-//mybatis.org//DTD Config 3.0//EN"
"http://mybatis.org/dtd/mybatis-3-config.dtd">
<configuration>
<!--引入properties文件,在spring配置文件中已经配置-->
<properties resource="jdbc.properties"></properties>
<settings>
<!--将表中字段的下划线自动转换为驼峰-->
<setting name="mapUnderscoreToCamelCase" value="true"/>
<!--开启延迟加载-->
<setting name="lazyLoadingEnabled" value="true"/>
</settings>
<!--设置类型别名-->
<typeAliases>
<!--以包为单位,将包下所有的类型设置默认的类型别名,即类名且不区分大小写-->
<package name="com.wang.pojo"/>
</typeAliases>
<!--设置数据库,在spring配置文件中已经配置-->
<environments default="development">
<environment id="development">
<transactionManager type="JDBC"/>
<dataSource type="POOLED">
<!--设置连接数据库的驱动-->
<property name="driver" value="${jdbc.driver}"/>
<!--设置连接数据库的连接地址-->
<property name="url" value="${jdbc.url}"/>
<!--设置连接数据库的用户名-->
<property name="username" value="${jdbc.username}"/>
<!--设置连接数据库的密码-->
<property name="password" value="${jdbc.password}"/>
</dataSource>
</environment>
</environments>
<!--引入MyBatis映射文件,在spring配置文件中已经配置-->
<mappers>
<package name="com.wang.mapper"/>
</mappers>
</configuration>⑤从容器中获取Mapper对象进行使用
@Autowired
private UserDao userDao;
//...测试代码
public class MybatisTest {
@Test
public void getEmpAndDeptTest(){
System.out.println(user.getEmpAndDept(1));//直接写写测试代码
}⑥对比未整合Spring中的测试
public class MybatisTest {
@Test
public void getEmpAndDeptTest(){
SqlSession sqlSession = SqlsessionUtils.getSqlSession();//先创建容器
EmpMapper mapper = sqlSession.getMapper(EmpMapper.class);//再获取容器中的对象
System.out.println(mapper.getEmpAndDept(1));//最后才能写测试代码
}8.Spring声明式事务(transaction )
8.1 概念
首次学习到事务这一概念是在数据库中,经典的例子是转账
eg.
A有100,B有100
A向B转10,
①A-10=90
②B+10=110。
但是①和②非原子性操作,可能导致①执行成功,但是②执行失败
所以事务中ACID这一概念提出
隔离性
多个事务之间要相互隔离,不能互相干扰
原子性
指事务是一个不可分割的整体,类似一个不可分割的原子
一致性
保障事务前后这组数据的状态是一致的。要么都是成功的,要么都是失败的。
持久性
指事务一旦被提交,这组操作修改的数据就真的的发生变化了。即使接下来数据库故障也不应该对其有影响。
8.2 实现声明式事务
在数据库中或java中都有说明事务的封装容器,过程都是:
1、开启事务begin transaction,即创建事务管理容器(对比连接数据库需要sqlsessionFactory容器一样)
2.1 当未发生错误,提交事务transaction commit
2.2 当发生错误,回滚事务transaction rollback
3.关闭事务 close
现在接触Spring系列,spring自带Bean标签和注解的形式,可以通过映射或注解来声明事务,而无须创建事务容器,进行调用
spring实现事务方式有:
1.注解
2.xml配置
eg.
数据库:
CREATE DATABASE /*!32312 IF NOT EXISTS*/`spring_db` /*!40100 DEFAULT CHARACTER SET utf8 */;
USE `spring_db`;
DROP TABLE IF EXISTS `account`;
CREATE TABLE `account` (
`id` INT(11) NOT NULL AUTO_INCREMENT,
`name` VARCHAR(50) DEFAULT NULL,
`money` DOUBLE DEFAULT NULL,
PRIMARY KEY (`id`)
) ENGINE=INNODB AUTO_INCREMENT=3 DEFAULT CHARSET=utf8;
INSERT INTO `account`(`id`,`name`,`money`) VALUES (1,'三更',100),(2,'草堂',100);
Spring整合Mybatis(省略)
创建Service和Dao
public interface AccountService {
/**
* 转账
* @param outId 转出账户的id
* @param inId 转出账户的id
* @param money 转账金额
*/
public void transfer(Integer outId,Integer inId,Double money);
}
@Service
public class AccountServiceImpl implements AccountService {
@Autowired
private AccoutDao accoutDao;
public void transfer(Integer outId, Integer inId, Double money) {
//增加
accoutDao.updateMoney(inId,money);
//减少
accoutDao.updateMoney(outId,-money);
}
}
dao层
public interface AccoutDao {
void updateMoney(@Param("id") Integer id,@Param("updateMoney") Double updateMoney);
}
AccoutDao.xml如下:(相对于Mapper层)
<?xml version="1.0" encoding="UTF-8" ?>
<!DOCTYPE mapper PUBLIC "-//mybatis.org//DTD Mapper 3.0//EN" "http://mybatis.org/dtd/mybatis-3-mapper.dtd" >
<mapper namespace="com.sangeng.dao.AccoutDao">
<update id="updateMoney">
update account set money = money + #{updateMoney} where id = #{id}
</update>
</mapper>
注解实现
①配置事务管理器和事务注解驱动
在spring的配置文件中添加如下配置:
<!--把事务管理器注入Spring容器,需要配置一个连接池-->
<bean id="txManager" class="org.springframework.jdbc.datasource.DataSourceTransactionManager">
<property name="dataSource" ref="dataSource"/>
</bean>
<!--开启事务注解驱动,配置使用的事务管理器-->
<tx:annotation-driven transaction-manager="txManager"/>
②添加注解
在需要进行事务控制的方法或者类上添加@Transactional注解就可以实现事务控制。
@Transactional
public void transfer(Integer outId, Integer inId, Double money) {
//增加
accoutDao.updateMoney(inId,money);
// System.out.println(1/0);
//减少
accoutDao.updateMoney(outId,-money);
}注意:如果加在类上,这个类的所有方法都会受事务控制,如果加在方法上,就是那一个方法受事务控制。
注意,因为声明式事务底层是通过AOP实现的,所以最好把AOP相关依赖都加上。
<dependency>
<groupId>org.aspectj</groupId>
<artifactId>aspectjweaver</artifactId>
<version>1.9.6</version>
</dependency>xml方式实现
①配置事务管理器
<bean id="txManager" class="org.springframework.jdbc.datasource.DataSourceTransactionManager">
<property name="dataSource" ref="dataSource"/>
</bean>②配置事务切面
<!--定义事务管理的通知类-->
<tx:advice transaction-manager="txManager" id="txAdvice">
<tx:attributes>
<tx:method name="trans*"/>
</tx:attributes>
</tx:advice>
<aop:config>
<aop:pointcut id="pt" expression="execution(* com.sangeng.service..*.*(..))"></aop:pointcut>
<aop:advisor advice-ref="txAdvice" pointcut-ref="pt"></aop:advisor>
</aop:config>注意,因为声明式事务底层是通过AOP实现的,所以最好把AOP相关依赖都加上。
<dependency>
<groupId>org.aspectj</groupId>
<artifactId>aspectjweaver</artifactId>
<version>1.9.6</version>
</dependency>8.3 属性配置
8.3.1事务传播行为propagation属性
当事务方法嵌套调用时,需要控制是否开启新事务,可以使用事务传播行为来控制。
eg.加入@Transactional在一个类上,导致一个类中的所有方法都进入事务管理中,当一个非主要方法发生异常,会导致类中所有方法发生事务回滚,这样导致程序耦合性强。所以在@Transactional这个注解中修改行为,去挽救耦合度
| 属性值 | 行为 |
|---|---|
| REQUIRED(必须要有)(默认) | 外层方法有事务,内层方法就加入。外层没有,内层就新建 |
| REQUIRES_NEW(必须要有新事务) | 外层方法有事务,内层方法新建事务。外层没有,内层也新建 |
| SUPPORTS(支持有) | 外层方法有事务,内层方法就加入。外层没有,内层就也没有 |
| NOT_SUPPORTED(支持没有) | 外层方法有事务,内层方法没有。外层没有,内层也没有 |
| MANDATORY(强制要求外层有) | 外层方法有事务,内层方法加入。外层没有。内层就报错 |
| NEVER(绝不允许有) | 外层方法有事务,内层方法就报错。外层没有。内层就也没有 |
可以把事务换成线程来“翻译”理解:
REQUIRED(默认),相对于:外层方法有线程1,内层方法就加入线程1。外层没有线程1,内层就新建线程1
REQUIRES_NEW(必须要有新事务),相对于:外层方法有线程1,内层方法新建线程2。外层没有线程,内层也新建线程,
这个属性就避免了一个类中使用@Transactional,使用方法都使用一个事务(线程)
其他的省略不写
eg.
@Transactional(propagation = Propagation.REQUIRES_NEW)
public void transfer(Integer outId, Integer inId, Double money) {
//增加
accoutDao.updateMoney(inId,money);
//减少
accoutDao.updateMoney(outId,-money);
}
8.3.2 隔离级别isolation属性
Isolation.DEFAULT 使用数据库默认隔离级别
Isolation.READ_UNCOMMITTED
Isolation.READ_COMMITTED
Isolation.REPEATABLE_READ
Isolation.SERIALIZABLE’
与数据库中隔离级别是一致的,所以不详细展开
eg.
@Transactional(propagation = Propagation.REQUIRES_NEW,isolation = Isolation.READ_COMMITTED)
public void transfer(Integer outId, Integer inId, Double money) {
//增加
accoutDao.updateMoney(inId,money);
//减少
accoutDao.updateMoney(outId,-money);
}
8.3.3只读readOnly属性
如果事务中的操作都是读操作,没涉及到对数据的写操作可以设置readOnly为true。这样可以提高效率。
eg.
@Transactional(readOnly = true)
public void log() {
System.out.println("打印日志");
int i = 1/0;
}